月度归档:2010年05月

Ubuntu下使用vpn连接远程服务器[转]

服务器提供了vpn接入点,这样在家里也可以通过vpn连到公司的服务器里作一些事情。昨天下午申请了vpn帐号,然后先在windows下试着连 接vpn服务器,一切okay,证明自己的vpn帐户没有问题,于是今天准备在Ubuntu下也配置一下vpn的访问环境。

  我使用的VPN客户端是 Ubuntu官方源里提供的 pptp-linux。先sudo apt-get install pptp-linux 下载安装pptp 客户端。

  然后查了一下pptp的manual,也在网上search了一下,发现pptp的命令行选项貌似还比较简单:

  sudo pptp user password <密码>。

  公司的vpn服务器的外网ip是 100.100.1.1,内网ip是192.168.1.1,vpn用户名是hello,密码是hello,,于是在调用如下命令以后:

  sudo pptp 100.100.1.1 user hello password hello

  再ifconfig,发现新增加了一个名称为ppp0的网络连接,这个连接对应的ip地址应该是跟你连接的vpn服务器所属的内网地址属于同一 网段。在我的这个应用场景中新增加的ppp0网络连接对应的ip地址是192.168.1.x。这个新建立的ppp0连接就是用于提供vpn连接服务的。

  然后我就试着ping公司的vpn服务器的内网ip 192.168.1.1,能够正常ping通。再ping其他服务器,如192.168.1.10,发现ping命令失败!很不解,花了点时间想了想,猜 测有可能是访问公司服务器的相应网关的设置不正确。于是试着:

  route add 192.168.1.10 gw 192.168.1.1

  然后再试着ping 192.168.1.10,这次就可以正常ping通了。

  然后试着ssh登录192.168.1.10,也成功了。

  至此,我在Ubuntu下的vpn工作环境配置完毕。
巧用apache的rewrite伪静态实现自动生成html静态化

以前用过或是写过的生成html静态化有一个最麻烦的操作,

每次新加一篇文章、新建一个分类或是在header或footer改动了文字,都要全盘重新生成,如果有几万甚至于几十万上百万篇文章,那还不是等它生成html等得郁闷。

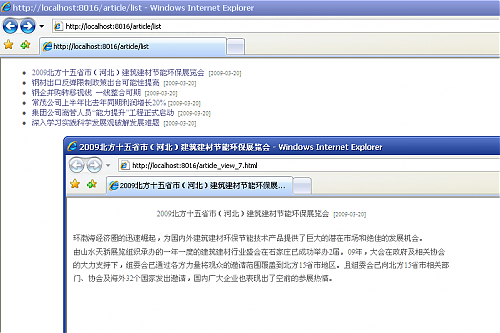
所以有了一个新的想法,就是让用户第一次打开这篇文章或是列表、首页时,自动生成这篇文章或列表、首页的html文件。这样,当文章没有更新的情况下,每二个用户打开就是html了,这样就实现了自动化的生成静态。主要使用的是php中我们常写的文件缓存方式进行工作。

但是毕竟是生成静态化,跟url有关系,所以就想到了apache的rewrite伪静态
例如:文章的php完整访问地址:/?m=article&a=view&1=6  rewrite成静态化的真实地址 /article_view_6.html
这样,所有的链接都使用的是/article_view_6.html 第一次执行,用的是rewrite,然后生成了article_view_6.html这个文件,第二次访问。apache就直接使用article_view_6.html这个静态页面了

下面自己写的一个.htaccess文件,主要的作用就是rewrite静态化,如果html文件存在,则直接用,不使用伪静态(不执行php),后台如果对文章、首页或是列表页做了更改,只需把相应的html文件删除就行了,无需重新生成。


PHP代码
  1. <IfModule mod_rewrite.c>   
  2. RewriteEngine on   
  3. #rewrite规则   
  4. RewriteCond %{REQUEST_FILENAME} !-d   
  5. RewriteCond %{REQUEST_FILENAME} !-f   
  6. RewriteRule ^article_view_([0-9]+).html$ ?m=article&a=view&1=$1 [L]   
  7.   
  8. #去掉index.php  框架中需要使用   
  9. RewriteCond %{REQUEST_FILENAME} !-d   
  10. RewriteCond %{REQUEST_FILENAME} !-f   
  11. RewriteRule ^(.*)$ index.php/$1 [QSA,PT,L]   
  12.   
  13. </IfModule>   
  14.   


生成静态化类

PHP代码
  1. <?php   
  2. class html   
  3. {   
  4.     public function __construct()   
  5.     {   
  6.         ob_start();   
  7.     }   
  8.   
  9.     public function autoMkdir($file){   
  10.         $f=explode("/",$file);   
  11.         $dir=array();   
  12.         $alldir=;   
  13.         if(count($f)>0){   
  14.             foreach($f as $v){   
  15.                 if(!emptyempty($v) && strpos($v,‘.’)===false) $dir[]=$v;   
  16.             }   
  17.             for($i=0;$i<count($dir);$i++){   
  18.                 $alldir.=emptyempty($alldir)?$dir[$i]:‘/’.$dir[$i];   
  19.                 if(!is_dir($alldir)){   
  20.                     if(!@mkdir($alldir)){   
  21.                         throw new Exception(‘新建文件夹目录出错,请检查文件夹读写权限. ‘.$alldir);   
  22.                     }   
  23.                 }   
  24.             }   
  25.         }   
  26.     }   
  27.   
  28.     public function writehtml()   
  29.     {   
  30.         $file=$_SERVER[‘REQUEST_URI’];   
  31.         if(substr($file,-5)!=‘.html’return ;   
  32.         $file=substr($file,1);   
  33.         if(!file_exists($file)){   
  34.             $this->autoMkdir($file);   
  35.             $content = ob_get_contents();   
  36.             if(!@file_put_contents($file,$content)){   
  37.                 throw new Exception(‘写入html静态文件出错,请检查文件夹读写权限. ‘.$file);   
  38.             }   
  39.         }   
  40.     }   
  41. }   
  42. ?>  


使用方法:


PHP代码
  1. <?php   
  2. require_once("html.class.php");   
  3. $html=new html();   
  4. /*  
  5. 这里是执行php文件。  
  6. */  
  7.   
  8. //成生html文件,应该本句应放最后一行。   
  9. $html->writehtml();   
  10. ?>  


qq截图未命名.png

分享一个好东西zend guard 5.01的许可文件

Zend Guard 4已经被破解了,5的话,破解的难度比较大,最起码不是完美破解了,所以Zend Guard5在保护源码方面还是有一定作用的,但是它是 zend的一款收费软件,对于个人或是小公司来说费用还不低。现在在网上找到了一个许可文件,成功测试可用。现分享给大家!

如何注册Zend Guard?

打开ZendGuard,点菜单中的help,选择Register,选择Serch a license file on my disk,找到你保存在本机的zend_guard.zl的路径,点击注册即注册成功。

在zend guard 5.01上亲测,注册成功!

下载地址:

zend_guard.zl

Building and Installing on Ubuntu 9.10[转]

在ubuntu下编译hiphop for php还是非常简单的,邮件列表里有人发的安装过程:

HipHop has been developed on CentOS and Fedora, building on Ubuntu 9.10 is experimental.
At the moment, HipHop can only run on 64 bits systems.

Packages installation

Using sudo or as root user:

sudo apt-get install git-core cmake g++ libboost-dev flex bison re2c libmysqlclient-dev libxml2-dev libmcrypt-dev libicu-dev openssl binutils-dev libcap-dev libgd2-xpm-dev zlib1g-dev libtbb-dev libonig-dev libpcre3-dev git-core autoconf libtool libcurl4-openssl-dev libboost-system-dev libboost-program-options-dev libboost-filesystem-dev

Getting HipHop source-code

mkdir hiphop
cd hiphop
git clone git://github.com/facebook/hiphop-php.git
cd hiphop-php
export CMAKE_PREFIX_PATH=`/bin/pwd`/../
export HPHP_HOME=`/bin/pwd`
export HPHP_LIB=`/bin/pwd`/bin
git submodule init
git submodule update
cd ..

Building third-party libraries

libevent

wget http://www.monkey.org/~provos/libevent-1.4.13-stable.tar.gz
tar -xzvf libevent-1.4.13-stable.tar.gz
cd libevent-1.4.13-stable
cp ../hiphop-php/src/third_party/libevent.fb-changes.diff .
patch < libevent.fb-changes.diff
./configure --prefix=$CMAKE_PREFIX_PATH
make
make install
cd ..

ICU4

wget http://download.icu-project.org/files/icu4c/4.2.1/icu4c-4_2_1-src.tgz
tar -xvzf icu4c-4_2_1-src.tgz
cd icu/source
./configure --prefix=$CMAKE_PREFIX_PATH
make
make install
cd ../../

libCurl

Make sure that your system time is correct, otherwise ./configure will fail.

wget http://curl.haxx.se/download/curl-7.20.0.tar.gz
tar -xvzf curl-7.20.0.tar.gz
cd curl-7.20.0
cp ../hiphop-php/src/third_party/libcurl.fb-changes.diff .
patch -p0 < libcurl.fb-changes.diff
./configure --prefix=$CMAKE_PREFIX_PATH
make
make install
cd ..

Building HipHop

cd hiphop-php
cmake .
make