月度归档:2009年08月

LNMP Debian/Ubuntu下Nginx+MySQL+PHP+phpMyAdmin+Zend一键安装包beta发布

http://blog.licess.cn/lnmp-debian-ubuntu/

因为个人原因,LNMP经过几次跳票终于发布了,此次发布的是在Debian或者Ubuntu下的Nginx、PHP、MySQL、phpMyAdmin、Zend一键安装包,可以在VPS、独立主机上轻松的安装LNMP生产环境。

LNMP Ver0.2 for Debian/Ubuntu软件版本说明(2009年8月26日更新):
Nginx:0.7.61
PHP:5.2.10
MySQL:暂时使用的apt-get安装
Zend Optimizer :3.3.3

使用说明:
如果系统预安装Apahce或你已经安装Apache,请先运行ap-get remove httpd,删除Apache!
登陆Linux,下载LNMP压缩包,并解压. (一些朋友可能不知道怎么弄,登陆VPS或者主机,

执行命令 wget http://soft.vpser.net/lnmp/lnmp0.2.tar.gz ,将lnmp0.2.tar.gz下载到VPS中,执行 tar zxvf lnmp0.2.tar.gz解压LNMP一键安装包)。
执行命令 cd lnmp
然后再执行./debian.sh ,输入要绑定的域名,回车后。程序会自动安装编译Nginx、PHP、MySQL、phpMyAdmin、Zend这几个软件。
安装大约10分钟左右需要设置MySQL root用户的密码。

程序安装路径:
MySQL :   /usr/bin
PHP :     /usr/local/php
Nginx :   /usr/local/nginx
PHPMyAdmin /home/wwwroot/phpmyadmin
Web目录    /home/wwwroot/

添加虚拟主机:

修改/usr/local/nginx/conf/nginx.conf 文件

server
 {
  listen  80;
  server_name  status.lnmp.org;

  location / {
   stub_status on;
   access_log   off;
  }
 }

后面添加上下面代码:

server
 {
  listen       80;
  server_name www.lnmp.org;
  index index.html index.htm index.php;
  root  /web/www/abc;

  location ~ .*\.(php|php5)?$
   {
    fastcgi_pass  unix:/tmp/php-cgi.sock;
    #fastcgi_pass  127.0.0.1:9000;
    fastcgi_index index.php;
    include fcgi.conf;
   }

  location ~ .*\.(gif|jpg|jpeg|png|bmp|swf)$
   {
    expires      30d;
   }

  location ~ .*\.(js|css)?$
   {
    expires      12h;
   }

  access_log   off;
 }

再执行kill -HUP `cat /usr/local/nginx/logs/nginx.pid`虚拟机就生效了。

通过下面这几个链接查看phpinfo和管理MySQL
phpinfo    http://domain.name/phpinfo.php
phpMyAdmin http://domain.name/phpmyadmin

此版本为测试版本,已经在DiaVPSRASHOSTSWVPSthenynoc.com、BoxVPS、VMware Debian最小化安装 上测试成功。

演示站点:http://www.vpser.net

QQ交流群:VPS群:7617036   Linux群:12327692

反馈网址:CentOS/RedHat版 http://blog.licess.cn/lnmp/
Debian/Ubuntu版 http://blog.licess.cn/lnmp-debian-ubuntu/

交流论坛: http://bbs.vpser.net
下载地址:http://soft.vpser.net/lnmp/lnmp0.2.tar.gz
友情提示:Linux下操作请注意大小写。
ubuntu 9.04安装eAccelerator

ubuntu 9.04 先装好 LAMP服务器环境

在网址打上http://localhost/,应该会出现It’s Work

接下来准备安装eAccelerator

sudo apt-get install autoconf
sudo apt-get install automake
sudo apt-get install libtool
sudo apt-get install m4
sudo apt-get install php5-dev
sudo apt-get install make


然后再去eAccelerator官网下载0.9.6版的
wget http://bart.eaccelerator.net/source/0.9.6/eaccelerator-0.9.6-rc1.tar.bz2


下载解压缩后,打开
eaccelerator-0.9.6-rc1文件夹

接下来就进行编译,终端输入
export PHP_PREFIX="/usr"
sudo $PHP_PREFIX/bin/phpize
./configure \
–enable-eaccelerator=shared \
–with-php-config=$PHP_PREFIX/bin/php-config
sudo make

sudo make install

======安装完成======
接下来修改php.ini(正常路径会在/etc/php5/apache2里面)

sudo vi /etc/php5/apache2/php.ini

在再后加上,注意,如果有安装zendOptimizer的话,下面这段应当放在[zend]上面


[eaccelerator]
zend_extension=/usr/lib/php5/20060613+lfs/eaccelerator.so
eaccelerator.shm_size=16
eaccelerator.cache_dir=/tmp/eaccelerator
eaccelerator.enable=1
eaccelerator.optimizer=1
eaccelerator.check_mtime=1
eaccelerator.debug=0
eaccelerator.filter=""
eaccelerator.shm_max=0
eaccelerator.shm_ttl=0
eaccelerator.shm_prune_period=0
eaccelerator.shm_only=0
eaccelerator.compress=1
eaccelerator.compress_level=9


建立cache的目录
sudo mkdir /tmp/eaccelerator
sudo chmod 0777 /tmp/eaccelerator

重新启动apache2
sudo /etc/init.d/apache2 restart

建立一个phpinfo.php在www文件夹


<?php
phpinfo();
?>

在浏览可器中查找 eaccelerator 就能知道是否安装成功!

改写thinkphp内置分页类,使之支持ajax分页

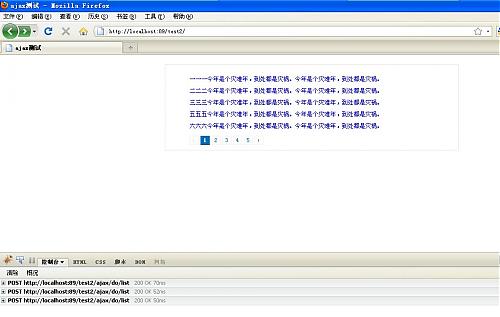
在网上下了一个在原thinkphp分页类基础上添加了多种样式的分页类,但是项目要使用ajax分页,所以在它的基础上做了一点小改动,以支持ajax分页

类文件及css文件下载

page.class.php.rar

演示代码

/Lib/Action/test2Action.class.php


PHP代码
  1. <?php   
  2. class test2Action extends Action{   
  3.     public function index()   
  4.     {   
  5.         $this->display();   
  6.     }   
  7.   
  8.     public function ajax()   
  9.     {   
  10.         if($_GET[‘do’]==‘list’){   
  11.             $_GET[‘page’]=$_POST[‘page’];   
  12.             $perapective_=D(‘Perapective’);   
  13.             import("@.ORG.Page"); //导入分页类      
  14.             C(‘PAGE_NUMBERS’,’10’); //Discuz分布是显示前后共10页的按钮   
  15.             C(‘VAR_PAGE’,‘page’);   
  16.             C(‘AJAX_FUNCTION’,‘getlist’);   
  17.             $total = $perapective_->count();   
  18.             $pnew Page($total,5);   
  19.   
  20.             if($data=$perapective_->findAll(,,‘pid desc’,$p->firstRow.‘,’.$p->listRows)){   
  21.                 $status=0;   
  22.                 $info[‘page’] = $p->show();   
  23.                 $info[‘style’]="manu";//分页样式   
  24.             }else{   
  25.                 $status=1;   
  26.             }   
  27.             $this->ajaxReturn($data,$info,$status);    
  28.         }   
  29.     }   
  30. }   
  31. ?>  


前台模板文件:


XML/HTML代码
  1. <!DOCTYPE html PUBLIC "-//W3C//DTD XHTML 1.0 Transitional//EN" "http://www.w3.org/TR/xhtml1/DTD/xhtml1-transitional.dtd">  
  2. <html xmlns="http://www.w3.org/1999/xhtml">  
  3. <head>  
  4. <title>ajax测试</title>  
  5.   
  6. <meta http-equiv="Content-Type" content="text/html; charset=utf-8" />  
  7. <meta http-equiv="X-UA-Compatible" content="IE=EmulateIE7" />  
  8. <SCRIPT LANGUAGE="JavaScript" src="/public/js/jquery.js"></SCRIPT>  
  9. <style>  
  10. body{font-size:12px;}   
  11. a:link,a:visited,a:active{ color:#000; text-decoration:none;}   
  12. a:hover{ color:#87B600; text-decoration:none;}   
  13. #box{margin:20px auto;width:600px;border:1px solid #E6E6E6}   
  14. #menu{clear:both;float:right;}   
  15. #menu ul{list-style:none;clear:both;}   
  16. #menu ul li{float:left;margin:3px;width:70px;text-align:center;}   
  17. #listbox{margin:10px auto;width:580px;display:none;}   
  18. #listbox ul{list-style:none;}   
  19. #listbox ul li{color:blue;padding-top:10px;}   
  20. #page{clear:both;text-align:left;padding-left:35px;}   
  21. .clear{clear:both;}   
  22. </style>  
  23. <link rel="stylesheet" type="text/css" href="/public/css/style2.css" />  
  24. </head>  
  25. <body>  
  26.   
  27. <div id="box">  
  28.     <div id="menu">  
  29.         <ul>  
  30.                
  31.         </ul>  
  32.            
  33.     </div>  
  34.     <div id="listbox"></div>  
  35.        
  36.     <div class="clear"></div>  
  37. </div>  
  38. <SCRIPT LANGUAGE="JavaScript">  
  39. <!–   
  40.     function getlist(page){   
  41.         url="/test2/ajax/do/list";   
  42.         var html="";   
  43.         $.post(url,{page:page},function(data){   
  44.             list=data.data;   
  45.             page=data.info.page;   
  46.             style=data.info.style;   
  47.             status=data.status;   
  48.             if(status==0){   
  49.                 html+="<ul>";   
  50.                 for(var i = 0; i < list.length; i++){   
  51.                     html+="<li>"+list[i].title+"</li>"   
  52.                 }   
  53.                 html+="</ul>";   
  54.                 html+="<div id=‘page’ class=‘"+style+"’>"+page+"</div>";   
  55.             }else{   
  56.                 html+="无数据!";   
  57.             }   
  58.             $("#listbox").html(html);   
  59.             $("#listbox").show();   
  60.         },"json");   
  61.     }   
  62.     getlist(1);   
  63. //–>  
  64. </SCRIPT>  
  65. </body>  


效果图

ddd.jpg