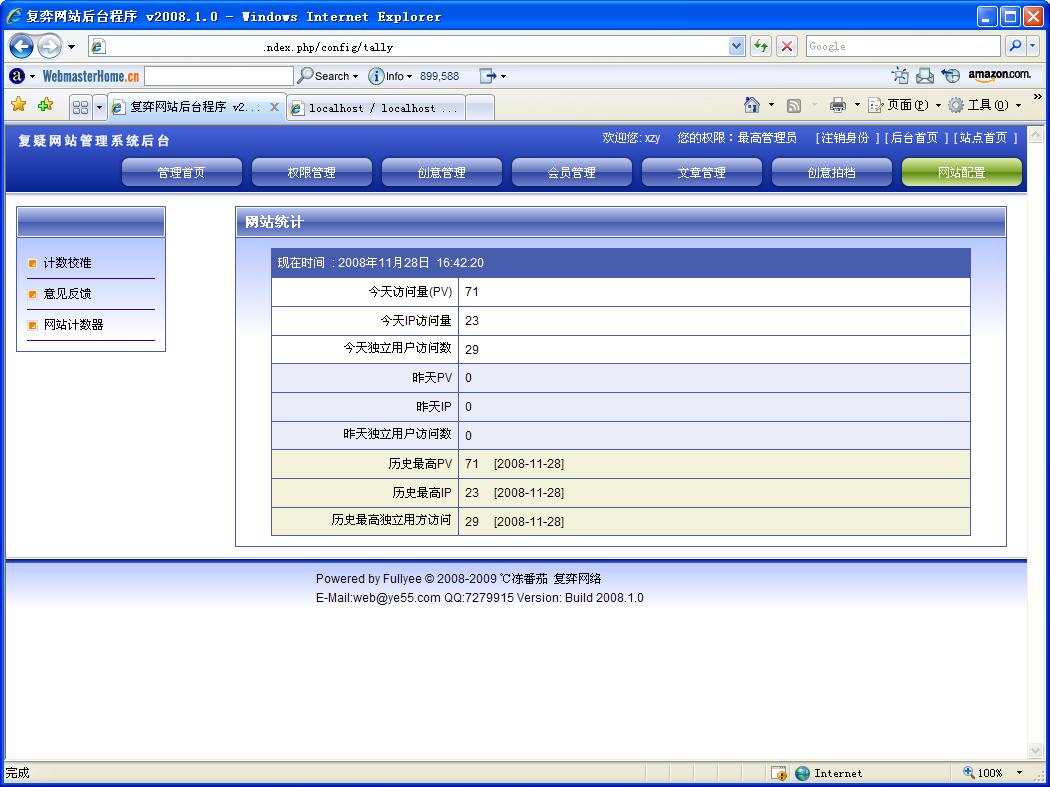
jquery使用Jcrop插件轻松实现上传图片后选取区域做头像

jquery使用Jcrop插件轻松实现上传图片后选取区域做头像

一般网站上传头像部分会比较麻烦,如果完全程序控制的话,程序把上传的图片自动裁切成指定大小的头像的话,很有可能会破坏头像的整体美观。所以现在大多数web2.0网站都有用js或flash来实现头像的上传与选取!

现在用jquery加上jcrop插件的话,就可以非常简单的实现这些功能!如果再加上编写的一些ajax处理部分的话就基本上可以满足一般web2.0的使用要求了

 aaaa1.jpg

aaaa2.jpg

PHP代码
  1. <?php  
  2. if($_GET[‘act’]==‘saveThumb’){  
  3.     $targ_w = $targ_h = 150;  
  4.     $jpeg_quality = 100;  
  5.   
  6.     $src = $_POST[‘bigImage’];  
  7.     $img_r = imagecreatefromjpeg($src);  
  8.     $dst_r = ImageCreateTrueColor( $targ_w$targ_h );  
  9.   
  10.     imagecopyresampled($dst_r,$img_r,0,0,$_POST[‘x’],$_POST[‘y’],$targ_w,$targ_h,$_POST[‘w’],$_POST[‘h’]);  
  11.   
  12.     header(‘Content-type: image/jpeg’);  
  13.     imagejpeg($dst_r,null,$jpeg_quality);  
  14.       
  15.     exit;  
  16. }  
  17. ?>  
  18. <html>  
  19.     <head>  
  20.   
  21.         <script src="jquery.pack.js"></script>  
  22.         <script src="jquery.Jcrop.pack.js"></script>  
  23.           
  24.         <link rel="stylesheet" href="jquery.Jcrop.css" type="text/css" />  
  25.           
  26.         <script language="Javascript">  
  27.   
  28.             $(function(){  
  29.   
  30.                   
  31.             });  
  32.               
  33.             function goss(){  
  34.   
  35.                 jQuery(‘#cropbox’).Jcrop({  
  36.                     onChange: showPreview,  
  37.                     onSelect: showPreview,  
  38.                     onSelect: updateCoords,  
  39.                     aspectRatio: 1  
  40.                 });  
  41.   
  42.             }  
  43.   
  44.             function updateCoords(c)  
  45.             {  
  46.                 $(‘#x’).val(c.x);  
  47.                 $(‘#y’).val(c.y);  
  48.                 $(‘#w’).val(c.w);  
  49.                 $(‘#h’).val(c.h);  
  50.             };  
  51.   
  52.             function checkCoords()  
  53.             {  
  54.                 if ($(‘#x’).val()==){  
  55.                     alert(‘请先上传头像然后选择裁切头像最后进行保存!’);  
  56.                     return false;  
  57.                 }  
  58.             };  
  59.               
  60.             function showPreview(coords)  
  61.             {  
  62.                 var rx = 150 / coords.w;  
  63.                 var ry = 150 / coords.h;  
  64.                 var w2=$("#bigwidth").val();  
  65.                 var h2=$("#bigheight").val();  
  66.                 jQuery(‘#preview’).css({  
  67.                     width: Math.round(rx * w2) + ‘px’,  
  68.                     height: Math.round(ry * h2) + ‘px’,  
  69.                     marginLeft: ‘-‘ + Math.round(rx * coords.x) + ‘px’,  
  70.                     marginTop: ‘-‘ + Math.round(ry * coords.y) + ‘px’  
  71.                 });  
  72.             }  
  73.   
  74.         </script>  
  75.   
  76.     </head>  
  77.   
  78.     <body>  
  79. <?php  
  80. if($_GET[‘act’]==‘upload’){  
  81.     if($_POST[‘upload’]==‘upload’){  
  82.           
  83.         $uploaddir =‘upload/’;  
  84.         $uploadfile = $uploaddir . basename($_FILES[‘file’][‘name’]);  
  85.         //print_r($_FILES[‘file’]);  
  86.         //echo $uploadfile;  
  87.       
  88.         if (move_uploaded_file($_FILES[‘file’][‘tmp_name’], $uploadfile)) {  
  89.             list($w$h$type$attr)=getimagesize($uploadfile);  
  90.             $str=;  
  91.             if($w>550){  
  92.                 $str="width:550px;";  
  93.             }  
  94.             if($h>550){  
  95.                 $str.="  height:550px;";  
  96.             }  
  97.             $str=emptyempty($str)?:"style=’ ".$str." ‘";  
  98.             $f1="<img src=’$uploadfile’ border=0 $str id=’cropbox’ >";  
  99.             $f2="<img src=’$uploadfile’ border=0  $str id=’preview’ >";  
  100.   
  101.               
  102.               
  103.             echo ‘<script language="javascript">parent.$("#showBig").html("’.$f1.‘");parent.$("#showThumb").html("’.$f2.‘");parent.goss();parent.$("#bigwidth").val("’.$w.‘");parent.$("#bigheight").val("’.$h.‘");parent.$("#bigImage").val("’.$uploadfile.‘");</script>’;  
  104.                   
  105.         }else {  
  106.             echo "<script>alert(‘文件上传失败!’);</script>";  
  107.         }  
  108.           
  109.     }  
  110. ?>  
  111.   
  112. <div style="margin:0px;font-size:12px;">  
  113. <FORM ACTION="?act=upload" METHOD=POST enctype="multipart/form-data">  
  114.   
  115.     <input type="file" name="file" id="file" />  
  116.   
  117.   <input type="submit" name="button" id="button" value="提交" />  
  118.   
  119.   <input name="upload" type="hidden" id="upload" value="upload" /><input type="hidden" name="MAX_FILE_SIZE" value="3000000" />  
  120. </FORM>  
  121. </div>  
  122.   
  123.   <?php  
  124.   exit;  
  125. }  
  126. ?>  
  127.   
  128.   
  129. <div id="showBig" style="width:500px;height:500px;border:2px solid #E6E0CE;padding:3px;"></div>  
  130. <iframe style="width:500px;height:60px;padding:0px;" src="?act=upload"></iframe>  
  131.   
  132.   
  133. <div id="showThumb" style="width:152px;height:152px;border:1px solid #cccccc;padding:1px; overflow: hidden;"></div>  
  134. <div style="margin-top:20px;">  
  135.     <form action="?act=saveThumb" method="post" onsubmit="return checkCoords();">  
  136.         <input type="hidden" id="bigImage" name="bigImage" />  
  137.         <input type="hidden" id="bigwidth" name="bigwidth" />  
  138.         <input type="hidden" id="bigheight" name="bigheight" />  
  139.         <input type="hidden" id="x" name="x" />  
  140.         <input type="hidden" id="y" name="y" />  
  141.         <input type="hidden" id="w" name="w" />  
  142.         <input type="hidden" id="h" name="h" />  
  143.         <input type="submit" value="保存用户头像" />  
  144.     </form>  
  145. </div>  
  146.     </body>  
  147.   
  148. </html>  


jcrop.zip

jquery使用Jcrop插件轻松实现上传图片后选取区域做头像

jquery使用Jcrop插件轻松实现上传图片后选取区域做头像

一般网站上传头像部分会比较麻烦,如果完全程序控制的话,程序把上传的图片自动裁切成指定大小的头像的话,很有可能会破坏头像的整体美观。所以现在大多数web2.0网站都有用js或flash来实现头像的上传与选取!

现在用jquery加上jcrop插件的话,就可以非常简单的实现这些功能!如果再加上编写的一些ajax处理部分的话就基本上可以满足一般web2.0的使用要求了

PHP代码
  1. <?php  
  2. if($_GET[‘act’]==‘saveThumb’){  
  3.     $targ_w = $targ_h = 150;  
  4.     $jpeg_quality = 100;  
  5.   
  6.     $src = $_POST[‘bigImage’];  
  7.     $img_r = imagecreatefromjpeg($src);  
  8.     $dst_r = ImageCreateTrueColor( $targ_w$targ_h );  
  9.   
  10.     imagecopyresampled($dst_r,$img_r,0,0,$_POST[‘x’],$_POST[‘y’],$targ_w,$targ_h,$_POST[‘w’],$_POST[‘h’]);  
  11.   
  12.     header(‘Content-type: image/jpeg’);  
  13.     imagejpeg($dst_r,null,$jpeg_quality);  
  14.       
  15.     exit;  
  16. }  
  17. ?>  
  18. <html>  
  19.     <head>  
  20.   
  21.         <script src="jquery.pack.js"></script>  
  22.         <script src="jquery.Jcrop.pack.js"></script>  
  23.           
  24.         <link rel="stylesheet" href="jquery.Jcrop.css" type="text/css" />  
  25.           
  26.         <script language="Javascript">  
  27.   
  28.             $(function(){  
  29.   
  30.                   
  31.             });  
  32.               
  33.             function goss(){  
  34.   
  35.                 jQuery(‘#cropbox’).Jcrop({  
  36.                     onChange: showPreview,  
  37.                     onSelect: showPreview,  
  38.                     onSelect: updateCoords,  
  39.                     aspectRatio: 1  
  40.                 });  
  41.   
  42.             }  
  43.   
  44.             function updateCoords(c)  
  45.             {  
  46.                 $(‘#x’).val(c.x);  
  47.                 $(‘#y’).val(c.y);  
  48.                 $(‘#w’).val(c.w);  
  49.                 $(‘#h’).val(c.h);  
  50.             };  
  51.   
  52.             function checkCoords()  
  53.             {  
  54.                 if ($(‘#x’).val()==){  
  55.                     alert(‘请先上传头像然后选择裁切头像最后进行保存!’);  
  56.                     return false;  
  57.                 }  
  58.             };  
  59.               
  60.             function showPreview(coords)  
  61.             {  
  62.                 var rx = 150 / coords.w;  
  63.                 var ry = 150 / coords.h;  
  64.                 var w2=$("#bigwidth").val();  
  65.                 var h2=$("#bigheight").val();  
  66.                 jQuery(‘#preview’).css({  
  67.                     width: Math.round(rx * w2) + ‘px’,  
  68.                     height: Math.round(ry * h2) + ‘px’,  
  69.                     marginLeft: ‘-‘ + Math.round(rx * coords.x) + ‘px’,  
  70.                     marginTop: ‘-‘ + Math.round(ry * coords.y) + ‘px’  
  71.                 });  
  72.             }  
  73.   
  74.         </script>  
  75.   
  76.     </head>  
  77.   
  78.     <body>  
  79. <?php  
  80. if($_GET[‘act’]==‘upload’){  
  81.     if($_POST[‘upload’]==‘upload’){  
  82.           
  83.         $uploaddir =‘upload/’;  
  84.         $uploadfile = $uploaddir . basename($_FILES[‘file’][‘name’]);  
  85.         //print_r($_FILES[‘file’]);  
  86.         //echo $uploadfile;  
  87.       
  88.         if (move_uploaded_file($_FILES[‘file’][‘tmp_name’], $uploadfile)) {  
  89.             list($w$h$type$attr)=getimagesize($uploadfile);  
  90.             $str=;  
  91.             if($w>550){  
  92.                 $str="width:550px;";  
  93.             }  
  94.             if($h>550){  
  95.                 $str.="  height:550px;";  
  96.             }  
  97.             $str=emptyempty($str)?:"style=’ ".$str." ‘";  
  98.             $f1="<img src=’$uploadfile’ border=0 $str id=’cropbox’ >";  
  99.             $f2="<img src=’$uploadfile’ border=0  $str id=’preview’ >";  
  100.   
  101.               
  102.               
  103.             echo ‘<script language="javascript">parent.$("#showBig").html("’.$f1.‘");parent.$("#showThumb").html("’.$f2.‘");parent.goss();parent.$("#bigwidth").val("’.$w.‘");parent.$("#bigheight").val("’.$h.‘");parent.$("#bigImage").val("’.$uploadfile.‘");</script>’;  
  104.                   
  105.         }else {  
  106.             echo "<script>alert(‘文件上传失败!’);</script>";  
  107.         }  
  108.           
  109.     }  
  110. ?>  
  111.   
  112. <div style="margin:0px;font-size:12px;">  
  113. <FORM ACTION="?act=upload" METHOD=POST enctype="multipart/form-data">  
  114.   
  115.     <input type="file" name="file" id="file" />  
  116.   
  117.   <input type="submit" name="button" id="button" value="提交" />  
  118.   
  119.   <input name="upload" type="hidden" id="upload" value="upload" /><input type="hidden" name="MAX_FILE_SIZE" value="3000000" />  
  120. </FORM>  
  121. </div>  
  122.   
  123.   <?php  
  124.   exit;  
  125. }  
  126. ?>  
  127.   
  128.   
  129. <div id="showBig" style="width:500px;height:500px;border:2px solid #E6E0CE;padding:3px;"></div>  
  130. <iframe style="width:500px;height:60px;padding:0px;" src="?act=upload"></iframe>  
  131.   
  132.   
  133. <div id="showThumb" style="width:152px;height:152px;border:1px solid #cccccc;padding:1px; overflow: hidden;"></div>  
  134. <div style="margin-top:20px;">  
  135.     <form action="?act=saveThumb" method="post" onsubmit="return checkCoords();">  
  136.         <input type="hidden" id="bigImage" name="bigImage" />  
  137.         <input type="hidden" id="bigwidth" name="bigwidth" />  
  138.         <input type="hidden" id="bigheight" name="bigheight" />  
  139.         <input type="hidden" id="x" name="x" />  
  140.         <input type="hidden" id="y" name="y" />  
  141.         <input type="hidden" id="w" name="w" />  
  142.         <input type="hidden" id="h" name="h" />  
  143.         <input type="submit" value="保存用户头像" />  
  144.     </form>  
  145. </div>  
  146.     </body>  
  147.   
  148. </html>  

下载


jcrop.zip

在windows下启用php的mail()函数进行发信

其实要想在windows下使用php的mail()函数进行发信的话,只要机器里安装了smtp就可以了

当然iis有内置的smtp,可是如果web服务器安装的是apache的话总不可能为了一个smtp而再去安装一个iis吧

所以找了个简单的smtp服务器软件(1st SMTP Server)找的是一个老版本的,才700多k,没有其它的无用功能!

先下载好1st SMTP Server后,运行里面的注册机,再运行主程序,进行注册。注册完了后就可以关闭主程序窗口了,在任务栏里双击1st SMTP Server图标,可以看到它的主界面!这时,应该smtp服务就正常运行了,像dns和smtp端口之类的默认就好了。

未命名.jpg

第二步。设置php.ini

找到

[mail function]
SMTP = localhost
smtp_port = 25
sendmail_from = web@phpd.cn


如果加了;的话,去掉就可以了,apache重启一下,这样php的mail()就可以正常工作了


1st SMTP Server 下载

fstsmtp.rar


今天花了一天时间整了个简单的框架

写时好像老是受thinkphp及fleaphp的影响,所以写了个不伦不类

而且好像效率上也不太行,光框架就占内存221k,执行速度也在0.02秒左右 如果加上smarty的话,内存立即增到500多k执行时间0.03秒左右!

以后把它再优化一下,写这个框架的初衷就是为了快速,低消耗!写下来后才发现要改正的地方还不少!

目前框架还是个半成品,只是实现了控制器部分,视图用的是smarty 然后数据模型部分现在还没有完善,缓存处理方面还没写!

未命名.jpg

自动从标题中提取关键词及ajax输入提示

公司网站正在新做的一个功能

考虑到最近blog里没写什么新的东西就把这段代码贴一下

test.html

XML/HTML代码
  1. <html>  
  2. <head>  
  3. <title>自动从标题中提取关键词及ajax输入提示</title>  
  4. <script src="js/jquery.js" type="text/javascript" charset="utf-8"></script>  
  5.   <link href="css/global.css" rel="stylesheet" type="text/css" />  
  6. </head>  
  7. <body style="padding:20px;">  
  8. <form id="form1" name="form1" method="post" action="javascript:;">  
  9.    标题:<input type="text" name="title" id="title" />  
  10.   <label>  
  11.  <input type="submit" name="button" id="button" value="提交" onclick="sendTitle()"/>  
  12.   </label>  
  13. <input name="add" type="hidden" id="add" value="add" />  
  14. </form>  
  15. <br>  
  16.   企业:<input type="text" name="key" id="key" onkeyup="showKey()"/>  
  17. <input type="hidden" name="keys" id="keys" value="">  
  18. <style>  
  19. #showBox{overflow:auto;width:250px;border:1px solid #eee;height:100px;margin-top:10px;}   
  20. div{padding:3px;}   
  21. </style>  
  22. <div id="showBox"></div>  
  23.   
  24.   
  25. <script type="text/javascript">  
  26. function sendTitle(){   
  27.     if($("#title").val()==”){   
  28.         alert("标题不能为空");   
  29.     }else{   
  30.         $.post("?index/test/sendtitle",{title:$("#title").val()},function(data){   
  31.             var html="";   
  32.             for(var i = 0; i < data.length; i++){   
  33.                 html+="<div>"+data[i].companyid+" | "+data[i].c_name+"</div>"   
  34.             }   
  35.             $("#showBox").html(html);   
  36.             $("#key").val($("#title").val());   
  37.             $("#keys").val($("#title").val());   
  38.                
  39.         },"json");   
  40.     }   
  41. }   
  42.   
  43. function showKey(){   
  44.     var key=$("#key").val();   
  45.     var keys=$("#keys").val();   
  46.     if(key!=keys){   
  47.         $.post("?index/test/sendtitle",{title:key},function(data){   
  48.             var html="";   
  49.             for(var i = 0; i < data.length; i++){   
  50.                 var ii2=i+1;   
  51.                 html+="<div>"+i2+" | "+data[i].c_name+"</div>"   
  52.             }   
  53.             $("#showBox").html(html);   
  54.             $("#keys").val(key);   
  55.         },"json");   
  56.     }   
  57. }   
  58.   
  59. </script>  
  60.   
  61. </body>  
  62. </html>  


php处理部分:


PHP代码
  1. <?php   
  2. class box   
  3. {   
  4.     public function __construct($db)   
  5.     {   
  6.         $this->db=$db;   
  7.     }   
  8.   
  9.     //读出全部的企业关键词,用于处理标题,提取标题中对应有关的企业列表   
  10.     public function readCompanyKey($cachetime=3600*24) //关键词库的缓存时间默认为一天   
  11.     {   
  12.         global $ROOT_PATH;   
  13.         $file=$ROOT_PATH.‘/temp/CompanyKey.inc’;   
  14.         if(!file_exists($file)){   
  15.             $this->writeCompanyKey();   
  16.         }else{   
  17.             if(time()-filemtime($file)>$cachetime){   
  18.                 $this->writeCompanyKey();   
  19.             }   
  20.         }   
  21.         $row=unserialize(file_get_contents($file));   
  22.         return $row;   
  23.     }   
  24.        
  25.     //缓存全部的企业关键词库   
  26.     public function writeCompanyKey()   
  27.     {   
  28.         global $ROOT_PATH;   
  29.         $file=$ROOT_PATH.‘/temp/CompanyKey.inc’;   
  30.         $rs=$this->db->query("select * from `companykey`");   
  31.         $row = $rs->fetchall(PDO::FETCH_ASSOC);   
  32.            
  33.         $content=serialize($row);   
  34.         $fs=fopen($file,‘w’);   
  35.         if(fwrite($fs$content) === FALSE) {   
  36.             echo "不能写入到文件!请注意temp文件夹的读写权限";   
  37.             exit;   
  38.         }else{   
  39.             return true;   
  40.         }   
  41.         fclose($fs);   
  42.     }   
  43.        
  44.     //从标题中通过关键词库获取相关的企业列表   
  45.     public function getComapnyList($title)   
  46.     {   
  47.         $title=strtolower($title);   
  48.         $key=$this->readCompanyKey();   
  49.         //if(count($key)<=0){echo ‘出错,关键词不存在!’;exit;}   
  50.         foreach($key as $v){   
  51.             if(strpos($title,$v[‘key’])!==false){   
  52.                 $companyid[]=$v[‘companyid’];   
  53.                 //echo ‘1’;   
  54.             }   
  55.         }   
  56.            
  57.         //print_r($companyid);   
  58.         if(count($companyid)>0){   
  59.             $companyidArr=$this->listOrder($companyid);  //对获取的企业按权重进行排序,去除重复的企业   
  60.             foreach($companyidArr as $v){   
  61.                 $rs=$this->db->query("select `companyid`,`c_name` from `company` where `companyid`=’".$v."’ limit 1");   
  62.                 $row = $rs->fetchall(PDO::FETCH_ASSOC);   
  63.                 $list[]=$row[0];   
  64.             }   
  65.             return $list;   
  66.         }else{   
  67.             return false;   
  68.         }   
  69.     }   
  70.        
  71.   
  72.     //排序算法,按标题中同一个关键词的出现个数对其所对应的企业进行排序,并去除重复企业   
  73.     public function listOrder($arr){   
  74.         if(!is_array($arr)){   
  75.             return ;   
  76.         }   
  77.         $count=count($arr);   
  78.         $arr2=array_unique($arr);   
  79.         foreach($arr2 as $k=>$v){   
  80.             $i=0;   
  81.             $i2=0;   
  82.             for($l=$i2;$l<$count;$l++){   
  83.                 if($v==$arr[$l]){   
  84.                     $i++;   
  85.                     $s[$k]=$i;   
  86.                     //$s[$k][‘key’]=$i;   
  87.                     //$s[$k][‘var’]=$v;   
  88.                 }   
  89.                 $i2++;   
  90.             }   
  91.         }   
  92.         arsort($s);   
  93.         foreach($s as $k=>$v){   
  94.             $row[]=$arr[$k];   
  95.         }   
  96.         return $row;   
  97.     }   
  98. }   
  99.   
  100. $box=new box($db1);   
  101. if($uri[2]==‘sendtitle’){   
  102.     $title=$_POST[‘title’];   
  103.     $list=$box->getComapnyList($title);   
  104.     echo json_encode($list);   
  105.     exit;   
  106. }   
  107. $smarty->display("index/test.html");   
  108. exit();   
  109. ?>  

效果

qq截图未命名.jpg


vi中最最常用的一些命令

命令全部在命令模式下输入 (就是记得输命令时按下ESC键)

保存文件     :w    (注意,前面有:)

强制保存文件 :w!

退出文件但不保存    :q

强制奶出文件但不保存 :q!

保存并退出   :wq  (同理,如果是强制的话,加!)

==================================

在光标所在行插入新行    o      (注意,不是零,是字母o)

在光标前面插入字符     i

在光标后面输入字符      a

删除一行     dd

删除光标所在的字符    x

转到具体的一行    10gg  或是 :10    (10为行号)

转个首行     gg

转个尾行      shift+g

清空全部内容   :%d

清空光标所在行及下面全部行的内容   dG   (注意大小写)

撤销上一步操作     u

重做上一步操作     ctrl+r

搜索查找字符       ?str    或   /str     (str表示要查找的字符)

===========================================

这些是最基本的了,还有像替换之类的比较复杂的就找找vi的全部命令看看

Ubuntu vim 高亮

1、安装vim

       sudo apt-get install vim-full
2、配置文件的位置
在目录 /etc/vim 下面,有个名为vimrc的文件,这是系统中公共的vim配置文件,对所有用户都有效。
       3、设置语法高亮显示
1) 打开vimrc,添加以下语句来使得语法高亮显示:
syntax on
2) 如果此时语法还是没有高亮显示,那么在/etc目录下的profile文件中添加以下语句:
export TERM=xterm-color
      
       4、设置Windows风格的C/C++自动缩进(添加以下set语句到vimrc中)
              1设置(软)制表符宽度为4
                            set tabstop=4
                            set softtabstop=4
              2设置缩进的空格数为4
                          set shiftwidth=4
              3设置自动缩进即每行的缩进值与上一行相等;使用 noautoindent 取消设置:
set autoindent
              4设置使用 C/C++ 语言的自动缩进方式:
                          set cindent
              5)设置C/C++语言的具体缩进方式
                            set cinoptions={0,1s,t0,n-2,p2s,(03s,=.5s,>1s,=1s,:1s
              6)如果想在左侧显示文本的行号,可以用以下语句:
                          set nu
              7)最后,如果没有下列语句,就加上吧:
if &term=="xterm"
set t_Co=8
             set t_Sb=^[[4%dm
set t_Sf=^[[3%dm
endif

一下由网友kongove提供:

colorscheme elflord
"colorscheme darkblue
"colorscheme evening
"colorscheme murphy
"colorscheme torte
"colorscheme desert
这些事提供的一些配色方案,自选一种就很漂亮了~


22.jpg