1.没有钱,没有权,再不对你好点,你能跟我?
2.买了电脑不上宽带,就好比酒肉都准备好了却在吃饭前当了和尚。
3.天上掉钞票我不会弯腰,因为天上连馅饼都不会掉,更别说掉钞票了。
4.你给我买10条烟总比我去一次夜总会划算吧。
5.要我扫地就绝对不刷碗,要我刷碗就绝对不扫地,两样一起做?你当我是外星人啊!
6.躺在床上看电视不如在看电视时上床睡觉。
7.给我一个支点,我把邻居那小子的汽车翘到沟里去,省得他见我就按喇叭。
8.参加选美的那些女人,都找不到好男人,因为好男人都结婚了,比如我。
9.如果领导下个月再不给我加薪,我就辞职,辞职前再给他送两条中华,抽死他。
10.如果猪都会飞了,谁还买飞机?骑着猪上天不就行了。
11.我的领带又找不到了,是不是你昨天又没有找到抹布?
12.埃及,一个男人可以娶四个老婆,那得多累啊,还是中国好。
13.还是让我跪搓板吧,跪电暖气实在受不了啊!
14.就算是一只癞蛤蟆,我也决不娶母癞蛤蟆。
15.白酒一斤,我绝对没感觉,因为喝半斤就已经喝死了。
16.厕所看报纸等同于大便完了擦屁股,是一个流程,否则不叫完工。
17.儿子不听话可以适当的打打,要不就显不出老子的威严,台湾问题就是如此。
18.妈过生日,送脑白金还不如送两块大排骨煮煮吃,至少还能当下酒菜。
19.我才不去见网友,除非国家修改一夫一妻制。
20.下辈子我还找你,因为除了我,你是最傻的。
作者归档:℃冻番茄
上百个让你事半功倍的jquery插件
jQuery是一个了不起的javascript库,它可以是我们用很少的几句代码就可以创建出漂亮的页面效果。从网站的方面说,这使得javascript更加有趣。
File upload-文件上传
Ajax File Upload
jQUploader
Multiple File Upload plugin
jQuery File Style
Styling an input type file
Progress Bar Plugin
Form Validation-表单验证
Auto Help
Simple jQuery form validation
jQuery XAV – form validations
jQuery AlphaNumeric
Masked Input
TypeWatch Plugin
Text limiter for form fields
Ajax Username Check with jQuery
Form – Select Box stuff-表单-选取框
jQuery Combobox
jQuery controlled dependent (or Cascadign) Select List
Multiple Selects
Select box manipulation
Select Combo Plugin
jQuery – LinkedSelect
Auto-populate multiple select boxes
Choose Plugin (Select Replacement)
Form Basics, Input Fields, Checkboxes etc.-表单的基本输入框,选择框等
jQuery Form Plugin
jQuery-Form
jLook Nice Forms
jNice
Ping Plugin
Toggle Form Text
ToggleVal
jQuery Field Plugin
jQuery Form’n Field plugin
jQuery Checkbox manipulation
jTagging
jQuery labelcheck
Overlabel
3 state radio buttons
ShiftCheckbox jQuery Plugin
Watermark Input
jQuery Checkbox (checkboxes with imags)
jQuery SpinButton Control
jQuery Ajax Form Builder
jQuery Focus Fields
jQuery Time Entry
Time, Date and Color Picker-时间、日期和颜色选取
jQuery UI Datepicker
jQuery date picker plugin
jQuery Time Picker
Time Picker
ClickPick
TimePicker
Farbtastic jQuery Color Picker Plugin
Color Picker by intelliance.fr
Rating Plugins-投票插件
jQuery Star Rating Plugin
jQuery Star Rater
Content rater with asp.net, ajax and jQuery
Half-Star Rating Plugin
Search Plugins-搜索插件
jQuery Suggest
jQuery Autocomplete
jQuery Autocomplete Mod
jQuery Autocomplete by AjaxDaddy
jQuery Autocomplete Plugin with HTML formatting
jQuery Autocompleter
AutoCompleter (Tutorial with PHP&MySQL)
quick Search jQuery Plugin
Inline Edit & Editors-嵌入的编辑器,所见即所得的编辑器
jTagEditor
WYMeditor
jQuery jFrame
Jeditable – edit in place plugin for jQuery
jQuery editable
jQuery Disable Text Select Plugin
Edit in Place with Ajax using jQuery
jQuery Plugin – Another In-Place Editor
TableEditor
tEditable – in place table editing for jQuery
Audio, Video, Flash, SVG, etc-音频,视频,flash,svg等
jMedia – accessible multi-media embedding
JBEdit – Ajax online Video Editor
jQuery MP3 Plugin
jQuery Media Plugin
jQuery Flash Plugin
Embed QuickTime
SVG Integration
jQuery Multimedia Portfolio
jQuery YouTube Plugin
Photos/Images/Galleries-照片,图像,相册等
ThickBox
jQuery lightBox plugin
jQuery Multimedia Portfolio
jQuery Image Strip
jQuery slideViewer
jQuery jqGalScroll 2.0
jQuery – jqGalViewII
jQuery – jqGalViewIII
jQuery Photo Slider
jQuery Thumbs – easily create thumbnails
jQuery jQIR Image Replacement
jCarousel Lite
jQPanView
jCarousel
Interface Imagebox
Image Gallery using jQuery, Interface & Reflactions
simple jQuery Gallery
jQuery Gallery Module
EO Gallery
jQuery ScrollShow
jQuery Cycle Plugin
jQuery Flickr
jQuery Lazy Load Images Plugin
Zoomi – Zoomable Thumbnails
jQuery Crop – crop any image on the fly
Image Reflection
Google Map-google地图
jQuery Plugin googlemaps
jMaps jQuery Maps Framework
jQmaps
jQuery & Google Maps
jQuery Maps Interface forr Google and Yahoo maps
jQuery J Maps – by Tane Piper
Games-游戏
Tetris with jQuery
jQuery Chess
Mad Libs Word Game
jQuery Puzzle
jQuery Solar System (not a game but awesome jQuery Stuff)
Tables, Grids etc.-表格,格子等
UI/Tablesorter
jQuery ingrid
jQuery Grid Plugin
Table Filter – awesome!
TableEditor
jQuery Tree Tables
Expandable “Detail” Table Rows
Sortable Table ColdFusion Costum Tag with jQuery UI
jQuery Bubble
TableSorter
Scrollable HTML Table
jQuery column Manager Plugin
jQuery tableHover Plugin
jQuery columnHover Plugin
jQuery Grid
TableSorter plugin for jQuery
tEditable – in place table editing for jQuery
jQuery charToTable Plugin
jQuery Grid Column Sizing
jQuery Grid Row Sizing
Charts, Presentation etc.-图表
Flot
jQuery Wizard Plugin
jQuery Chart Plugin
Bar Chart
Border, Corners, Background-边,角,背景
jQuery Corner
jQuery Curvy Corner
Nifty jQuery Corner
Transparent Corners
jQuery Corner Gallery
Gradient Plugin
Text and Links-文本和链接
jQuery Spoiler plugin
Text Highlighting
Disable Text Select Plugin
jQuery Newsticker
Auto line-height Plugin
Textgrad – a text gradient plugin
LinkLook – a link thumbnail preview
pager jQuery Plugin
shortKeys jQuery Plugin
jQuery Biggerlink
jQuery Ajax Link Checker
Chili jQuery code highlighter plugin
jScroller
Tooltips-提示
jQuery Plugin – Tooltip
jTip – The jQuery Tool Tip
clueTip
BetterTip
Flash Tooltips using jQuery
ToolTip
Menus, Navigations-菜单,导航
jQuery Tabs Plugin – awesome! [demo nested tabs]
another jQuery nested Tab Set example (based on jQuery Tabs Plugin)
jQuery idTabs
jdMenu – Hierarchical Menu Plugin for jQuery
jQuery SuckerFish Style
jQuery Plugin Treeview
treeView Basic
FastFind Menu
Sliding Menu
Lava Lamp jQuery Menu
jQuery iconDock
jVariations Control Panel
ContextMenu plugin
clickMenu
CSS Dock Menu
jQuery Pop-up Menu Tutorial
Sliding Menu
Accordions, Slide and Toggle stuff-幻灯、翻转
jQuery Plugin Accordion
jQuery Accordion Plugin Horizontal Way
haccordion – a simple horizontal accordion plugin for jQuery
Horizontal Accordion by portalzine.de
HoverAccordion
Accordion Example from fmarcia.info
jQuery Accordion Example
jQuery Demo – Expandable Sidebar Menu
Sliding Panels for jQuery
jQuery ToggleElements
Coda Slider
jCarousel
Accesible News Slider Plugin
Showing and Hiding code Examples
jQuery Easing Plugin
jQuery Portlets
AutoScroll
Innerfade
Drag and Drop-拖拽
UI/Draggables
EasyDrag jQuery Plugin
jQuery Portlets
jqDnR – drag, drop resize
Drag Demos
XML XSL JSON Feeds
XSLT Plugin
jQuery Ajax call and result XML parsing
xmlObjectifier – Converts XML DOM to JSON
jQuery XSL Transform
jQuery Taconite – multiple Dom updates
RSS/ATOM Feed Parser Plugin
jQuery Google Feed Plugin
Browserstuff-浏览器相关
Wresize – IE Resize event Fix Plugin
jQuery ifixpng
jQuery pngFix
Link Scrubber – removes the dotted line onfocus from links
jQuery Perciformes – the entire suckerfish familly under one roof
Background Iframe
QinIE – for proper display of Q tags in IE
jQuery Accessibility Plugin
jQuery MouseWheel Plugin
Alert, Prompt, Confirm Windows-警告,提示,确认框
jQuery Impromptu
jQuery Confirm Plugin
jqModal
SimpleModal
CSS-样式表单
jQuery Style Switcher
JSS – Javascript StyleSheets
jQuery Rule – creation/manipulation of CSS Rules
jPrintArea
DOM, Ajax and other jQuery plugins-DOm,ajax以及其他
FlyDOM
jQuery Dimenion Plugin
jQuery Loggin
Metadata – extract metadata from classes, attributes, elements
Super-tiny Client-Side Include Javascript jQuery Plugin
Undo Made Easy with Ajax
JHeartbeat – periodically poll the server
Lazy Load Plugin
Live Query
jQuery Timers
jQuery Share it – display social bookmarking icons
jQuery serverCookieJar
jQuery autoSave
jQuery Puffer
jQuery iFrame Plugin
Cookie Plugin for jQuery
jQuery Spy – awesome plugin
Effect Delay Trick
jQuick – a quick tag creator for jQuery
Metaobjects
elementReady
ubuntu8.10快速架设nginx2.6+php5.2.6+mysql5.0 [修改1]
nginx的高效率是出了名了,最近想用它把服务器上的apache换掉,所以先在本地机上做了下测试。
下面为记录下的步骤!
第一步,安装mysql
sudo apt-get install mysql-server
第二步,安装php-cgi及所需gd库等
sudo apt-get install php5-cli php5-cgi php5-mysql php5-gd php5-mcrypt
第三步,安装nginx
sudo apt-get install nginx
第四步,从lighttpd中取得spawn-fcgi
apt-get install lighttpd
cp /usr/bin/spawn-fcgi ./
apt-get remove lighttpd
cp spawn-fcgi /usr/bin/
sudo vi /usr/bin/php-fastcgi
#!/bin/sh
/usr/bin/spawn-fcgi -a 127.0.0.1 -p 9000 -C 10 -u www-data -g www-data -f /u sr/bin/php-cgi
#注意 -C 10 表示开启10个php-cgi进程!
sudo chmod 755 /usr/bin/php-fastcg
sudo vi /etc/init.d/init-fastcgi
C++代码
- #!/bin/bash
- PHP_SCRIPT=/usr/bin/php-fastcgi
- RETVAL=0
- case "$1" in
- start)
- $PHP_SCRIPT
- RETVAL=$?
- ;;
- stop)
- killall -9 php5-cgi
- RETVAL=$?
- ;;
- restart)
- killall -9 php5-cgi
- $PHP_SCRIPT
- RETVAL=$?
- ;;
- *)
- echo "Usage: php-fastcgi {start|stop|restart}"
- exit 1
- ;;
- esac
- exit $RETVAL
chmod 755 /etc/init.d/php-fastcgi
开启spawn-fcgi
/etc/init.d/php-fastcgi start
写入开机启动!
update-rc.d php-fastcgi defaults
查看php-cgi进程
ps ax | grep php5-cgi
第五步,配置nginx
sudo vi /etc/nginx/sites-enabled/default
server {
listen 80;
server_name localhost;
access_log /var/log/nginx/localhost.access.log;
location / {
root /home/xzy/www;
index index.html index.htm index.php;
}
location /doc {
root /usr/share;
autoindex on;
allow 127.0.0.1;
deny all;
}
location /images {
root /usr/share;
autoindex on;
}
#error_page 404 /404.html;
# redirect server error pages to the static page /50x.html
#
error_page 500 502 503 504 /50x.html;
location = /50x.html {
root /var/www/nginx-default;
}
# proxy the PHP scripts to Apache listening on 127.0.0.1:80
#
#location ~ \.php$ {
#proxy_pass http://127.0.0.1;
#}
# pass the PHP scripts to FastCGI server listening on 127.0.0.1:9000
#去除php支持的注释!
location ~ \.php$ {
fastcgi_pass 127.0.0.1:9000;
fastcgi_index index.php;
#为防止php.ini里的cgi.fix_pathinfo 不为1的话,就直接修下php脚本运行的路径!
fastcgi_param SCRIPT_FILENAME /home/xzy/www$fastcgi_script_name;
include /etc/nginx/fastcgi_params;
}
# deny access to .htaccess files, if Apache’s document root
# concurs with nginx’s one
#开启支持.htaccess
location ~ /\.ht {
deny all;
}
#博客的图片较多,更改较少,将它们在浏览器本地缓存15天,可以提高下次打开我博客的页面加载速度。
location ~ .*\.(gif|jpg|jpeg|png|bmp|swf)$
{
expires 15d;
}
}
sudo gedit /etc/nginx/fastcgi_params
最后一行注释掉
#fastcgi_param REDIRECT_STATUS 200;
重启nginx sudo /etc/init.d/nginx restart 看是否运行正常,正常的话,环境就算搭配成功了!
在/home/xzy/www上新建一个a.php测试下phpinfo是否正常!
vi /home/xzy/www/a.php
<?php phpinfo();?>
最后优化下nginx
vi /etc/nginx/nginx.conf
user www-data;
#修改nginx的进程数,每个进程占内存10~15m 按服务器配置和应用需求来设
worker_processes 1;
error_log /var/log/nginx/error.log;
pid /var/run/nginx.pid;
events {
worker_connections 1024;
}
http {
include /etc/nginx/mime.types;
default_type application/octet-stream;
access_log /var/log/nginx/access.log;
sendfile on;
#tcp_nopush on;
#keepalive_timeout 0;
keepalive_timeout 65;
tcp_nodelay on;
gzip on;
#开启并设置gzip配置 对网页文件、CSS、JS、XML等启动gzip压缩,减少数据传输量,提高访问速度
gzip on;
gzip_min_length 1k;
gzip_buffers 4 16k;
gzip_http_version 1.0;
gzip_comp_level 2;
gzip_types text/plain application/x-javascript text/css application/xml;
gzip_vary on;
include /etc/nginx/conf.d/*.conf;
include /etc/nginx/sites-enabled/*;
}
小内存机器ubuntu下安装Nginx+php+Mysql+phpmyadmin
1,安装nginx,执行以下命令,很快完成,不过目前apg-get方式安装默认是0.5.33的版本
sudo apt-get install nginx
配置文件默认安装位置:
[quote]conf: /etc/nginx/nginx.conf
bin:/usr/sbin/nginx
vhost: /etc/nginx/sites-enable/default
cgi-params: /etc/nginx/fastcgi-params[/quote]
建一个虚拟Server
server {
listen 80;
server_name www.23day.com;
access_log /var/log/nginx/home.ucenter.access.log;
location / {
root /var/www/23day.com;
index index.php;
location ~ \.php$ {
fastcgi_pass 127.0.0.1:9000;
fastcgi_index index.php;
fastcgi_param SCRIPT_FILENAME /var/www/23day.com$fastcgi_script_name;
include /etc/nginx/fastcgi_params;
}
}
2,安装php-cgi模块
执行sudo apt-get install php5-cgi
配置文件默认安装位置:
php-cgi: /usr/bin/php-cgi
php5-cgi: /usr/bin/php5-cgi
cgi config: /usr/bin/cgi/php.ini [/quote]
修改php.ini文件的cgi.fix_pathinfo数据为1,默认为0 cgi.fix_pathinfo=1; 这样php-cgi方能正常使用SCRIPT_FILENAME这个变量.
3,安装spawn-fcgi spawn-fcgi是lighttpd的一个用来控制php-cgi的工具.
如果系统没有安装GCC编译环境,刚需要在安装lighttpd之前要安装build-essential工具包,执行以下命令
sudo apt-get install build-essential
wget http://www.lighttpd.net/download/lighttpd-1.4.19.tar.gz
tar -xvf lighttpd-1.4.19.tar.gz
cd lighttpd-1.4.19/
sudo apt-get install libpcre3-dev
./configure –without-zlib –without-bzip2
make
sudo cp src/spawn-fcgi /usr/local/bin/spawn-fcgi
这样cgi控制器就安装完成.
4.启动测试系统.启动fast_cgi:
spawn-fcgi -a 127.0.0.1 -p 9000 -C 5 -u www-data -g www-data -f /usr/bin/php-cgi
注意:ip,端口与nginx服务器中的cgi-pass要对应. -C表示打开几个cgi进程
启动nginx
sudo /etc/init.d/nginx start
好了,如果没有出错信息,则说明配置成功了,现在写个phpinfo测试下吧!
最后,附上我的/etc/nginx/sites-enable/default的配置文件,此配置文件启用了rewrite功能
server {
listen 80;
server_name localhost;
access_log /var/log/nginx/localhost.access.log;
location / {
root /var/www/nginx-default;
index index.php;
if (-f $request_filename/index.html){
rewrite (.*) $1/index.html break;
}
if (-f $request_filename/index.php){
rewrite (.*) $1/index.php;
}
if (!-f $request_filename){
rewrite (.*) /index.php;
}
}
#error_page 404 /404.html;
# redirect server error pages to the static page /50x.html
#
error_page 500 502 503 504 /50x.html;
location = /50x.html {
root /var/www/nginx-default;
}
# proxy the PHP scripts to Apache listening on 127.0.0.1:80
#
#location ~ \.php$ {
#proxy_pass http://127.0.0.1;
#}
# pass the PHP scripts to FastCGI server listening on 127.0.0.1:9000
#
location ~ \.php$ {
fastcgi_pass 127.0.0.1:9000;
fastcgi_index index.php;
fastcgi_param SCRIPT_FILENAME /var/www/nginx-default$fastcgi_script_name;
include /etc/nginx/fastcgi_params;
}
# deny access to .htaccess files, if Apache’s document root
# concurs with nginx’s one
#
#location ~ /\.ht {
#deny all;
#}
}
# another virtual host using mix of IP-, name-, and port-based configuration
#
#server {
#listen 8000;
#listen somename:8080;
#server_name somename alias another.alias;
#location / {
#root html;
#index index.html index.htm;
#}
#}
# HTTPS server
#
#server {
#listen 443;
#server_name localhost;
#ssl on;
#ssl_certificate cert.pem;
#ssl_certificate_key cert.key;
#ssl_session_timeout 5m;
#ssl_protocols SSLv2 SSLv3 TLSv1;
#ssl_ciphers ALL:!ADH:!EXPORT56:RC4+RSA:+HIGH:+MEDIUM:+LOW:+SSLv2:+EXP;
#ssl_prefer_server_ciphers on;
#location / {
#root html;
#index index.html index.htm;
#}
#}
nginx.conf优化
user www www;
#Nginx每个进程耗费10M~12M内存,这里只开启一个Nginx进程,节省内存。
worker_processes 1;
error_log /data1/logs/nginx_error.log crit;
pid /usr/local/webserver/nginx/nginx.pid;
#Specifies the value for maximum file descriptors that can be opened by this process.
worker_rlimit_nofile 51200;
events
{
use epoll;
worker_connections 51200;
}
http
{
include mime.types;
default_type application/octet-stream;
#charset gb2312;
server_names_hash_bucket_size 128;
client_header_buffer_size 32k;
large_client_header_buffers 4 32k;
sendfile on;
tcp_nopush on;
keepalive_timeout 60;
tcp_nodelay on;
fastcgi_connect_timeout 300;
fastcgi_send_timeout 300;
fastcgi_read_timeout 300;
fastcgi_buffer_size 64k;
fastcgi_buffers 4 64k;
fastcgi_busy_buffers_size 128k;
fastcgi_temp_file_write_size 128k;
#对网页文件、CSS、JS、XML等启动gzip压缩,减少数据传输量,提高访问速度。
gzip on;
gzip_min_length 1k;
gzip_buffers 4 16k;
gzip_http_version 1.0;
gzip_comp_level 2;
gzip_types text/plain application/x-javascript text/css application/xml;
gzip_vary on;
#limit_zone crawler $binary_remote_addr 10m;
server
{
listen 80;
server_name blog.s135.com www.s135.com s135.com *.s135.com;
index index.html index.htm index.php;
root /data0/htdocs/blog;
#limit_conn crawler 20;
#针对Bo-Blog系统的Rewrite静态化
rewrite ^/post/([0-9]+).htm$ /read.php?$1 last;
rewrite ^/post/([0-9]+)_([0-9]+).htm$ /read.php?$1&page=$2 last;
rewrite ^/post/([0-9]+)_([0-9]+)_([0-9]+).htm$ /read.php?$1&page=$2&part=$3 last;
rewrite ^/index_([0-9]+)_([0-9]+).htm$ /index.php?mode=$1&page=$2 last;
rewrite ^/star_([0-9]+)_([0-9]+).htm$ /star.php?mode=$1&page=$2 last;
rewrite ^/category_([0-9]+).htm$ /index.php?go=category_$1 last;
rewrite ^/category_([0-9]+)_([0-9]+)_([0-9]+).htm$ /index.php?go=category_$1&mode=$2&page=$3 last;
rewrite ^/archive_([0-9]+)_([0-9]+).htm$ /index.php?go=archive&cm=$1&cy=$2 last;
rewrite ^/archive_([0-9]+)_([0-9]+)_([0-9]+)_([0-9]+).htm$ /index.php?go=archive&cm=$1&cy=$2&mode=$3&page=$4 last;
rewrite ^/showday_([0-9]+)_([0-9]+)_([0-9]+).htm$ /index.php?go=showday_$1-$2-$3 last;
rewrite ^/showday_([0-9]+)_([0-9]+)_([0-9]+)_([0-9]+)_([0-9]+).htm$ /index.php?go=showday_$1-$2-$3&mode=$4&page=$5 last;
location ~ .*\.(php|php5)?$
{
#将Nginx与FastCGI的通信方式由TCP改为Unix Socket。TCP在高并发访问下比Unix Socket稳定,但Unix Socket速度要比TCP快。
fastcgi_pass unix:/tmp/php-cgi.sock;
#fastcgi_pass 127.0.0.1:9000;
fastcgi_index index.php;
include fcgi.conf;
}
location ~ /read.php
{
#将Nginx与FastCGI的通信方式由TCP改为Unix Socket。TCP在高并发访问下比Unix Socket稳定,但Unix Socket速度要比TCP快。
fastcgi_pass unix:/tmp/php-cgi.sock;
#fastcgi_pass 127.0.0.1:9000;
fastcgi_index index.php;
include fcgi.conf;
}
#博客的图片较多,更改较少,将它们在浏览器本地缓存15天,可以提高下次打开我博客的页面加载速度。
location ~ .*\.(gif|jpg|jpeg|png|bmp|swf)$
{
expires 15d;
}
#博客会加载很多JavaScript、CSS,将它们在浏览器本地缓存1天,访问者在看完一篇文章或一页后,再看另一篇文件或另一页的内容,无需从服务器再次下载相同的JavaScript、CSS,提高了页面显示速度。
location ~ .*\.(js|css)?$
{
expires 1d;
}
log_format access ‘$remote_addr – $remote_user [$time_local] "$request" ‘
‘$status $body_bytes_sent "$http_referer" ‘
‘"$http_user_agent" $http_x_forwarded_for’;
access_log /data1/logs/access.log access;
}
}
PHP 5.2.6(FastCGI)的配置优化
[eaccelerator]
zend_extension="/usr/local/webserver/php/lib/php/extensions/no-debug-non-zts-20060613/eaccelerator.so"
eaccelerator.shm_size="1"
eaccelerator.cache_dir="/usr/local/webserver/eaccelerator_cache"
eaccelerator.enable="1"
eaccelerator.optimizer="1"
eaccelerator.check_mtime="1"
eaccelerator.debug="0"
eaccelerator.filter=""
eaccelerator.shm_max="0"
eaccelerator.shm_ttl="3600"
eaccelerator.shm_prune_period="3600"
eaccelerator.shm_only="0"
eaccelerator.compress="1"
eaccelerator.compress_level="9"
eaccelerator.keys = "disk_only"
eaccelerator.sessions = "disk_only"
eaccelerator.content = "disk_only"
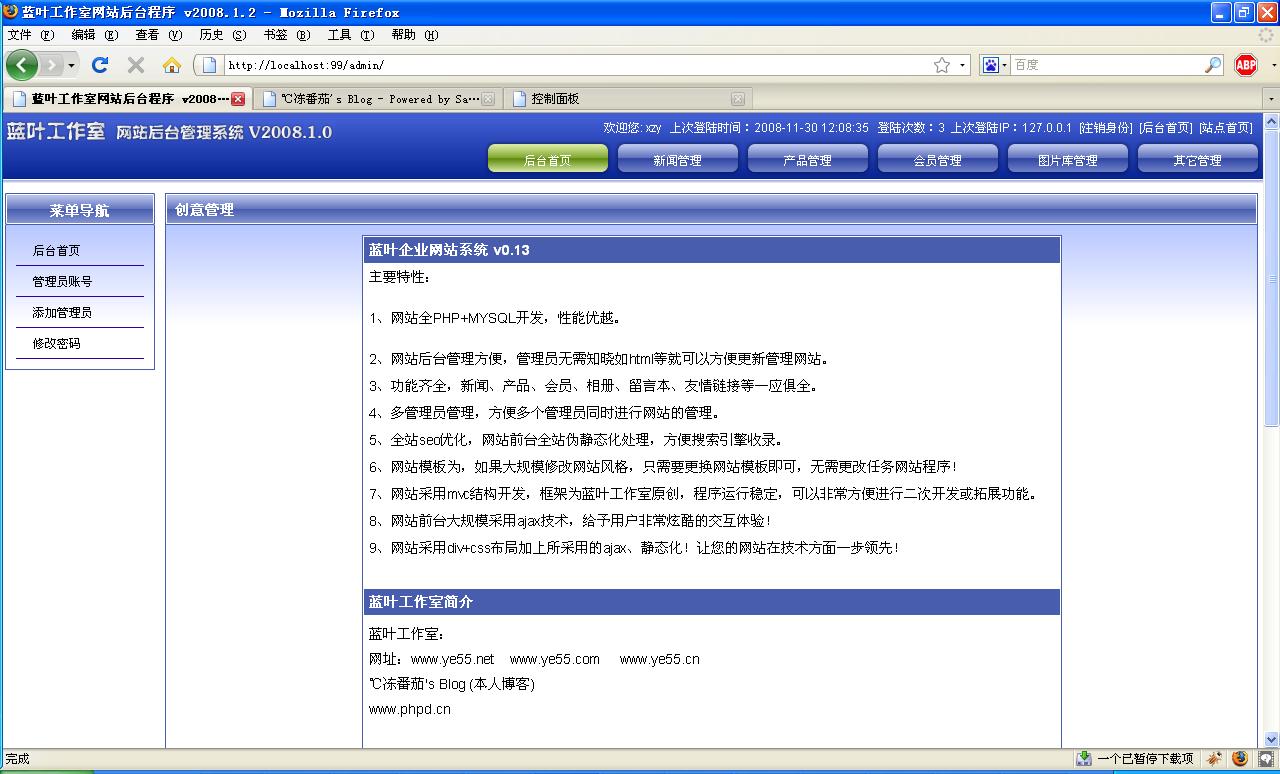
今天开始写一个通用的企业网站程序
最近要帮我哥的公司做一个企业网站,再加以我叔公司的网站到现在还是半成品就挂到网上了,心中老是过意不去,但是自己都去好好解决一下,最近也有空了,准备花上一周左右的时间,把这两个企业网站做掉。
做完这二个网站后,自己也准备做一个网站自己用了,时间过得真快,还有二个月就快过年了。。。感慨一下
下面是今天用了一下午修改了下自己以前的网站后台ui,后台界面就不重新做了凑合着用了。。
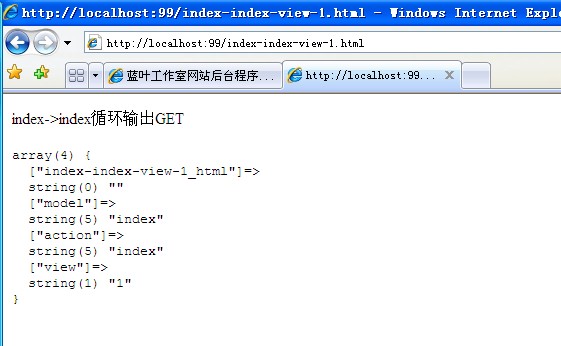
主是把数据库的视图查询部分做了下,然后完善了下框架的路由!
PHP代码
- <?php
- class Model{
- public $db;
- public function __construct()
- {
- $this->db= new PDO(conf(‘dbType’).‘:host=’.conf(‘dbHost’).‘;dbname=’.conf(‘dbName’), conf(‘dbUser’), conf(‘dbPass’));
- $this->db->exec(‘SET NAMES ‘.conf(‘charset’));
- }
- function query($sql)
- {
- $rs = $this->db->query($sql);
- return $rs;
- }
- function beginTransaction()
- {
- return $this->db->beginTransaction();
- }
- function commit()
- {
- return $this->db->commit();
- }
- function rollBack()
- {
- return $this->db->rollBack();
- }
- function exec($sql)
- {
- return $this->db->exec($sql);
- }
- function lastInsertId()
- {
- return $this->db->lastInsertId();
- }
- function setAttribute($attr, $value)
- {
- return $this->db->setAttribute($attr, $value);
- }
- function insert($table,$data)
- {
- $table=conf(‘dbprefix’).$table;
- $fields = "";
- $values = "";
- foreach($data as $field=>$value)
- {
- $fields .= "`$field`, ";
- $values .= "’$value’, ";
- }
- $fields = substr_replace($fields, "", -2, 1);
- $values = substr_replace($values, "", -2, 1);
- $sql = "insert into `$table` ($fields) values ($values)";
- //echo $sql;
- $rs = $this->db->query($sql) ;
- return $this->db->lastInsertId();
- }
- function del($table,$keyarr){
- $table=conf(‘dbprefix’).$table;
- $where = "";
- foreach($keyarr as $key=>$key_value)
- {
- $where .= "`$key`=’$key_value’";
- }
- $sql = "delete from `$table` where $where";
- $rs = $this->db->query($sql);
- return $rs;
- }
- function update($table,$data, $keyarr)
- {
- $table=conf(‘dbprefix’).$table;
- $set = "";
- foreach($data as $field=>$value)
- {
- $set .= "`$field`=’$value’, ";
- }
- $set = substr_replace($set, "", -2, 1);
- $where = "";
- foreach($keyarr as $key=>$key_value)
- {
- $where .= "`$key`=’$key_value’";
- }
- $sql = "update `$table` set $set where $where";
- //echo $sql;
- $rs = $this->db->query($sql);
- return $rs;
- }
- function find($table,$where=”,$field=‘*’,$order=”,$group=”)
- {
- $sql=$this->_map($table,$where,$field,$order,”,$group);
- //echo $sql;
- return $this->_find($sql);
- }
- function findAll($table,$where=”,$field=‘*’,$order=”,$limit=”,$group=”)
- {
- $sql=$this->_map($table,$where,$field,$order,$limit,$group);
- return $this->_findAll($sql);
- }
- function count($table,$where=”,$field=‘*’,$order=”,$group=”)
- {
- $sql=$this->_map($table,$where,$field,$order,”,$group);
- return $this->_count($sql);
- }
- function _count($sql)
- {
- $rs=$this->query($sql);
- $count=$rs->fetchColumn();
- $count=emptyempty($count)?0:$count;
- return $count;
- }
- function _find($sql)
- {
- $rs=$this->query($sql);
- $row=$rs->fetch(PDO::FETCH_ASSOC);
- return $row;
- }
- function _findAll($sql)
- {
- $rs=$this->query($sql);
- $row=$rs->fetchall(PDO::FETCH_ASSOC);
- return $row;
- }
- function _map($table,$where=”,$field=‘*’,$order=”,$limit=”,$group=”)
- {
- $order=emptyempty($order)?”:‘order by ‘.$order;
- $limit=emptyempty($group)?”:‘limit ‘.$limit;
- $group=emptyempty($group)?”:‘group by ‘.$group;
- $w=”;
- if(!emptyempty($where)){
- if(is_array($where)){
- $w.=‘where’;
- foreach($where as $k=>$v){
- $w.=" $k=’$v’ and";
- }
- $w=substr($w,0,strlen($w)-3);
- }else{
- $w=$where;
- }
- }
- if(is_array($table)){
- $table1=conf(‘dbprefix’).$table[0];
- //echo $table1;
- $count=count($table);
- $joinleft=”;
- array_shift($table);
- foreach($table as $v){
- foreach($v as $k2=>$v2){
- $k2=conf(‘dbprefix’).$k2;
- foreach($v2 as $k3=>$v3){
- $l="$table1.$k3=$k2.$v3";
- }
- $joinleft.="left join $k2 on $l ";
- }
- }
- $sql="select $field from $table1 $joinleft $w $order $group $limit";
- }else{
- $sql="select $field from $table $w $order $group $limit";
- }
- return $sql;
- }
- }
- //fetch(‘PDO_FETCH_ASSOC’)
- ?>
网站后台界面 调整了部分css,对ff的兼容性更好些
网站的url形式
好久没玩QQ音速了,今天刚玩就全连了一把
好久没玩QQ音速了应该有半年多了,今天刚玩就全连了一把
过瘾~
四个人跑,三个A,判定都是93,真巧
家里接的是网通宽带,也就只能玩玩网通区的小号了“`

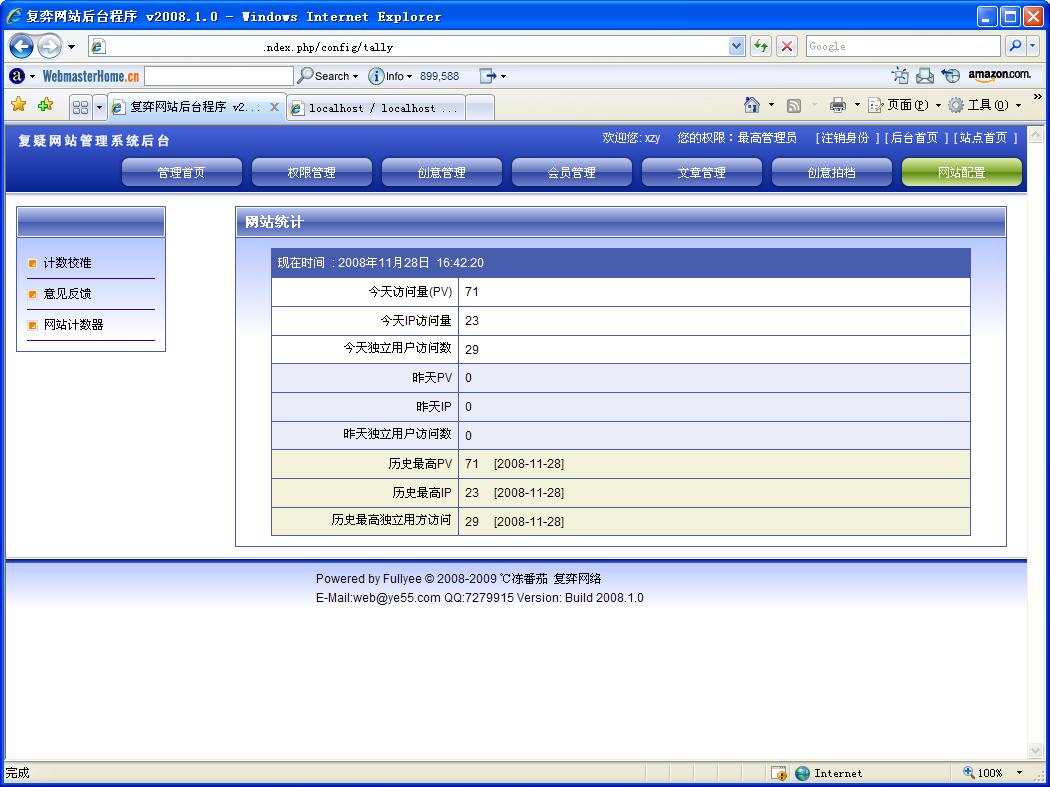
简单网站统计功能的实现(PV IP 真实访客数)
主要统计三个数值,网站的pv 和ip 以及真实访客数 因为有详细的统计记录,所以可以实现的功能还有很大的扩展!把tallydate使用内存表的话,速度就会更快了
需要用到二张表
SQL代码
- CREATE TABLE `tally` (
- `date` date NOT NULL,
- `pvtotal` int(10) NOT NULL,
- `iptotal` int(10) NOT NULL,
- `dltotal` int(10) NOT NULL,
- PRIMARY KEY (`date`)
- ) ENGINE=InnoDB DEFAULT CHARSET=utf8;
- CREATE TABLE `tallydata` (
- `tdid` int(10) NOT NULL auto_increment,
- `ip` int(10) NOT NULL,
- `cookie` varchar(32) NOT NULL,
- `date` date NOT NULL,
- `time` int(10) NOT NULL,
- `uri` varchar(255) default NULL,
- `referer` varchar(255) default NULL,
- PRIMARY KEY (`tdid`)
- ) ENGINE=InnoDB DEFAULT CHARSET=utf8 AUTO_INCREMENT=5 ;
统计的调用文件(用于所在统计的页面进行js调入):
(注:因项目使用的是ThinkPHP框架,所以贴出的只是代码片段!因为代码刚完成,所以没有做优化以及注释)
PHP代码
- <?php
- class TallyAction extends Action{
- public function index(){
- if($_SERVER[‘SERVER_NAME’]!=‘fullyee.com’ && $_SERVER[‘SERVER_NAME’]!=‘www.fullyee.com’ && $_SERVER[‘SERVER_NAME’]!=‘company.fullyee.com’) exit;
- $add[‘ip’]=ip2long(get_client_ip());
- if(!Cookie::is_set(‘fullyeetally’)){
- $value=md5(microtime().$add[‘ip’].rand());
- $overTime=mktime(0,0,0,date(‘m’),date(‘d’)+1,date(‘Y’))-time();
- Cookie::set("fullyeetally",$value,time()+$overTime);
- }
- $fullyeetally=Cookie::get(‘fullyeetally’);
- $add[‘cookie’]=$fullyeetally;
- $add[‘date’]=date(‘Y-m-d’);
- $add[‘time’]=time();
- $add[‘uri’]=$_SERVER[‘SERVER_NAME’].$_SERVER[‘REQUEST_URI’];
- $add[‘referer’]=$_SERVER[‘HTTP_REFERER’];
- $tallydata_=D(‘Tallydata’);
- $tallydata_->create($add);
- $tallydata_->add();
- }
- public function saveData()
- {
- $tally_=D(‘Tally’);
- $tallydata_=D(‘Tallydata’);
- $nowDate=date(‘Y-m-d’,time()-3600*24);
- $now[‘date’]=$nowDate;
- $now[‘iptotal’]=$this->gototal($nowDate,‘ip’);
- $now[‘pvtotal’]=$tallydata_->count(array(‘date’=>$nowDate),‘tdid’);
- $now[‘dltotal’]=$this->gototal($nowDate,‘cookie’);
- if($tally=$tally_->find(array(‘date’=>$nowDate))){
- $tally_->save(array(‘iptotal’=>$now[‘iptotal’],‘pvtotal’=>$now[‘pvtotal’],‘dltotal’=>$now[‘dltotal’]),array(‘date’=>$nowDate));
- }else{
- $tally_->create($now);
- $tally_->add();
- }
- $timeDel=time()-3600*24*50;
- $tallydata_->query("delete from `tallydate` where `time`<$timeDel");
- echo ‘Success ‘+date(‘Y-m-d H:i:s’);
- }
- function gototal($nowDate,$a)
- {
- $tallydata_=D(‘Tallydata’);
- $now[‘iptotal’]=$tallydata_->query("select count(distinct $a) from `tallydata` where `date`=’$nowDate’ ");
- return $now[‘iptotal’][0]["count(distinct $a)"];
- }
- }
- ?>
程序中的 saveDate 部分,用于服务器的定时运行,最简单的方法就是用linux的crontab在一个访问人数比较少的时间wget一下saveDate代码就行了。。这段代码的作用是,把前一天的访问数据全部统计,以天为单位写入tally表!并且删除一定时间外的统计记录。默认是删除50天以前的全部统计记录
显示部分:
PHP代码
- <?php
- class configAction extends Action{
- function _initialize(){
- header("Content-Type:text/html; charset=utf-8");
- }
- public function tally()
- {
- $tally_=D(‘Tally’);
- $tallydata_=D(‘Tallydata’);
- $nowDate=date(‘Y-m-d’);
- $now[‘date’]=$nowDate;
- $now[‘iptotal’]=$this->gototal($nowDate,‘ip’);
- $now[‘pvtotal’]=$tallydata_->count(array(‘date’=>$nowDate),‘tdid’);
- $now[‘dltotal’]=$this->gototal($nowDate,‘cookie’);
- if($tally=$tally_->find(array(‘date’=>$nowDate))){
- $tally_->save(array(‘iptotal’=>$now[‘iptotal’],‘pvtotal’=>$now[‘pvtotal’],‘dltotal’=>$now[‘dltotal’]),array(‘date’=>$nowDate));
- }else{
- $tally_->create($now);
- $tally_->add();
- }
- $today[‘pv’]=$now[‘pvtotal’];
- $today[‘ip’]=$now[‘iptotal’];
- $today[‘dl’]=$now[‘dltotal’];
- $yesterdayDate=date(‘Y-m-d’,time()-3600*24);
- //echo $yesterdayDate;
- $yesterday=$tally_->find(array(‘date’=>$yesterdayDate));
- //dump($yesterday);
- $yesterday[‘pv’]=isset($yesterday[‘pvtotal’])?$yesterday[‘pvtotal’]:‘0’;
- $yesterday[‘ip’]=isset($yesterday[‘iptotal’])?$yesterday[‘iptotal’]:‘0’;
- $yesterday[‘dl’]=isset($yesterday[‘dltotal’])?$yesterday[‘dltotal’]:‘0’;
- $maxpv=$this->gomax(‘pvtotal’);
- $maxip=$this->gomax(‘iptotal’);
- $maxdl=$this->gomax(‘dltotal’);
- $max[‘pv’]=$maxpv[‘pvtotal’];
- $max[‘pvdate’]=$maxpv[‘date’];
- $max[‘ip’]=$maxip[‘iptotal’];
- $max[‘ipdate’]=$maxip[‘date’];
- $max[‘dl’]=$maxdl[‘dltotal’];
- $max[‘dldate’]=$maxdl[‘date’];
- $this->assign(‘today’,$today);
- $this->assign(‘yesterday’,$yesterday);
- $this->assign(‘max’,$max);
- $this->assign(‘nowtime’,date(‘Y年m月d日 H:i:s’));
- $this->display();
- }
- function gomax($a)
- {
- $tally_=D(‘Tally’);
- $max=$tally_->query("select * from `tally` order by `$a` desc limit 1");
- return $max[0];
- }
- function gototal($nowDate,$a)
- {
- $tallydata_=D(‘Tallydata’);
- $now[‘iptotal’]=$tallydata_->query("select count(distinct $a) from `tallydata` where `date`=’$nowDate’ ");
- return $now[‘iptotal’][0]["count(distinct $a)"];
- }
- }
- ?>
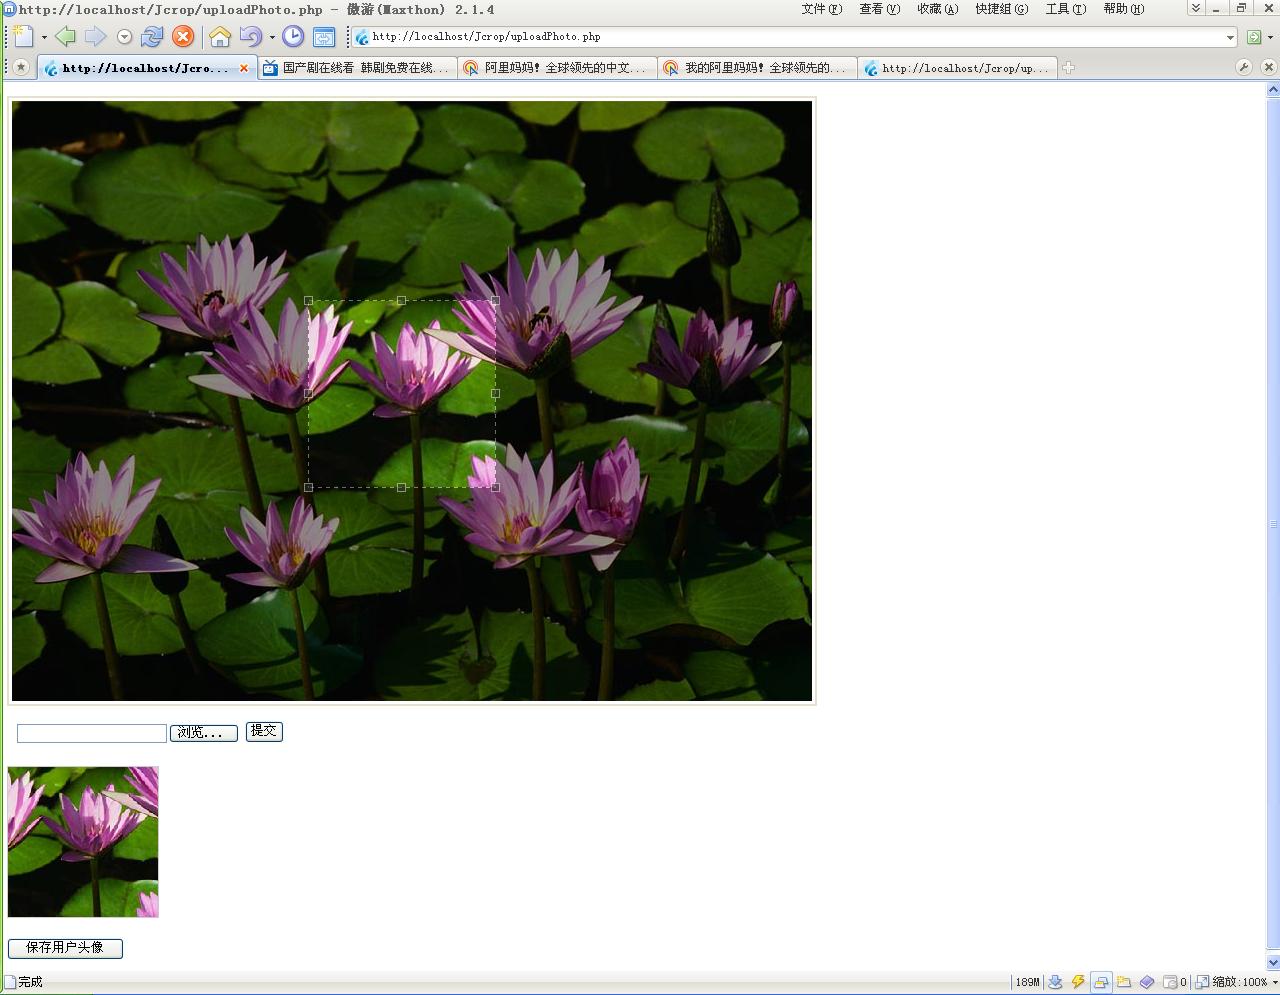
jquery使用Jcrop插件轻松实现上传图片后选取区域做头像
jquery使用Jcrop插件轻松实现上传图片后选取区域做头像
一般网站上传头像部分会比较麻烦,如果完全程序控制的话,程序把上传的图片自动裁切成指定大小的头像的话,很有可能会破坏头像的整体美观。所以现在大多数web2.0网站都有用js或flash来实现头像的上传与选取!
现在用jquery加上jcrop插件的话,就可以非常简单的实现这些功能!如果再加上编写的一些ajax处理部分的话就基本上可以满足一般web2.0的使用要求了

PHP代码
- <?php
- if($_GET[‘act’]==‘saveThumb’){
- $targ_w = $targ_h = 150;
- $jpeg_quality = 100;
- $src = $_POST[‘bigImage’];
- $img_r = imagecreatefromjpeg($src);
- $dst_r = ImageCreateTrueColor( $targ_w, $targ_h );
- imagecopyresampled($dst_r,$img_r,0,0,$_POST[‘x’],$_POST[‘y’],$targ_w,$targ_h,$_POST[‘w’],$_POST[‘h’]);
- header(‘Content-type: image/jpeg’);
- imagejpeg($dst_r,null,$jpeg_quality);
- exit;
- }
- ?>
- <html>
- <head>
- <script src="jquery.pack.js"></script>
- <script src="jquery.Jcrop.pack.js"></script>
- <link rel="stylesheet" href="jquery.Jcrop.css" type="text/css" />
- <script language="Javascript">
- $(function(){
- });
- function goss(){
- jQuery(‘#cropbox’).Jcrop({
- onChange: showPreview,
- onSelect: showPreview,
- onSelect: updateCoords,
- aspectRatio: 1
- });
- }
- function updateCoords(c)
- {
- $(‘#x’).val(c.x);
- $(‘#y’).val(c.y);
- $(‘#w’).val(c.w);
- $(‘#h’).val(c.h);
- };
- function checkCoords()
- {
- if ($(‘#x’).val()==”){
- alert(‘请先上传头像然后选择裁切头像最后进行保存!’);
- return false;
- }
- };
- function showPreview(coords)
- {
- var rx = 150 / coords.w;
- var ry = 150 / coords.h;
- var w2=$("#bigwidth").val();
- var h2=$("#bigheight").val();
- jQuery(‘#preview’).css({
- width: Math.round(rx * w2) + ‘px’,
- height: Math.round(ry * h2) + ‘px’,
- marginLeft: ‘-‘ + Math.round(rx * coords.x) + ‘px’,
- marginTop: ‘-‘ + Math.round(ry * coords.y) + ‘px’
- });
- }
- </script>
- </head>
- <body>
- <?php
- if($_GET[‘act’]==‘upload’){
- if($_POST[‘upload’]==‘upload’){
- $uploaddir =‘upload/’;
- $uploadfile = $uploaddir . basename($_FILES[‘file’][‘name’]);
- //print_r($_FILES[‘file’]);
- //echo $uploadfile;
- if (move_uploaded_file($_FILES[‘file’][‘tmp_name’], $uploadfile)) {
- list($w, $h, $type, $attr)=getimagesize($uploadfile);
- $str=”;
- if($w>550){
- $str="width:550px;";
- }
- if($h>550){
- $str.=" height:550px;";
- }
- $str=emptyempty($str)?”:"style=’ ".$str." ‘";
- $f1="<img src=’$uploadfile’ border=0 $str id=’cropbox’ >";
- $f2="<img src=’$uploadfile’ border=0 $str id=’preview’ >";
- echo ‘<script language="javascript">parent.$("#showBig").html("’.$f1.‘");parent.$("#showThumb").html("’.$f2.‘");parent.goss();parent.$("#bigwidth").val("’.$w.‘");parent.$("#bigheight").val("’.$h.‘");parent.$("#bigImage").val("’.$uploadfile.‘");</script>’;
- }else {
- echo "<script>alert(‘文件上传失败!’);</script>";
- }
- }
- ?>
- <div style="margin:0px;font-size:12px;">
- <FORM ACTION="?act=upload" METHOD=POST enctype="multipart/form-data">
- <input type="file" name="file" id="file" />
- <input type="submit" name="button" id="button" value="提交" />
- <input name="upload" type="hidden" id="upload" value="upload" /><input type="hidden" name="MAX_FILE_SIZE" value="3000000" />
- </FORM>
- </div>
- <?php
- exit;
- }
- ?>
- <div id="showBig" style="width:500px;height:500px;border:2px solid #E6E0CE;padding:3px;"></div>
- <iframe style="width:500px;height:60px;padding:0px;" src="?act=upload"></iframe>
- <div id="showThumb" style="width:152px;height:152px;border:1px solid #cccccc;padding:1px; overflow: hidden;"></div>
- <div style="margin-top:20px;">
- <form action="?act=saveThumb" method="post" onsubmit="return checkCoords();">
- <input type="hidden" id="bigImage" name="bigImage" />
- <input type="hidden" id="bigwidth" name="bigwidth" />
- <input type="hidden" id="bigheight" name="bigheight" />
- <input type="hidden" id="x" name="x" />
- <input type="hidden" id="y" name="y" />
- <input type="hidden" id="w" name="w" />
- <input type="hidden" id="h" name="h" />
- <input type="submit" value="保存用户头像" />
- </form>
- </div>
- </body>
- </html>
jquery使用Jcrop插件轻松实现上传图片后选取区域做头像
jquery使用Jcrop插件轻松实现上传图片后选取区域做头像
一般网站上传头像部分会比较麻烦,如果完全程序控制的话,程序把上传的图片自动裁切成指定大小的头像的话,很有可能会破坏头像的整体美观。所以现在大多数web2.0网站都有用js或flash来实现头像的上传与选取!
现在用jquery加上jcrop插件的话,就可以非常简单的实现这些功能!如果再加上编写的一些ajax处理部分的话就基本上可以满足一般web2.0的使用要求了
PHP代码
- <?php
- if($_GET[‘act’]==‘saveThumb’){
- $targ_w = $targ_h = 150;
- $jpeg_quality = 100;
- $src = $_POST[‘bigImage’];
- $img_r = imagecreatefromjpeg($src);
- $dst_r = ImageCreateTrueColor( $targ_w, $targ_h );
- imagecopyresampled($dst_r,$img_r,0,0,$_POST[‘x’],$_POST[‘y’],$targ_w,$targ_h,$_POST[‘w’],$_POST[‘h’]);
- header(‘Content-type: image/jpeg’);
- imagejpeg($dst_r,null,$jpeg_quality);
- exit;
- }
- ?>
- <html>
- <head>
- <script src="jquery.pack.js"></script>
- <script src="jquery.Jcrop.pack.js"></script>
- <link rel="stylesheet" href="jquery.Jcrop.css" type="text/css" />
- <script language="Javascript">
- $(function(){
- });
- function goss(){
- jQuery(‘#cropbox’).Jcrop({
- onChange: showPreview,
- onSelect: showPreview,
- onSelect: updateCoords,
- aspectRatio: 1
- });
- }
- function updateCoords(c)
- {
- $(‘#x’).val(c.x);
- $(‘#y’).val(c.y);
- $(‘#w’).val(c.w);
- $(‘#h’).val(c.h);
- };
- function checkCoords()
- {
- if ($(‘#x’).val()==”){
- alert(‘请先上传头像然后选择裁切头像最后进行保存!’);
- return false;
- }
- };
- function showPreview(coords)
- {
- var rx = 150 / coords.w;
- var ry = 150 / coords.h;
- var w2=$("#bigwidth").val();
- var h2=$("#bigheight").val();
- jQuery(‘#preview’).css({
- width: Math.round(rx * w2) + ‘px’,
- height: Math.round(ry * h2) + ‘px’,
- marginLeft: ‘-‘ + Math.round(rx * coords.x) + ‘px’,
- marginTop: ‘-‘ + Math.round(ry * coords.y) + ‘px’
- });
- }
- </script>
- </head>
- <body>
- <?php
- if($_GET[‘act’]==‘upload’){
- if($_POST[‘upload’]==‘upload’){
- $uploaddir =‘upload/’;
- $uploadfile = $uploaddir . basename($_FILES[‘file’][‘name’]);
- //print_r($_FILES[‘file’]);
- //echo $uploadfile;
- if (move_uploaded_file($_FILES[‘file’][‘tmp_name’], $uploadfile)) {
- list($w, $h, $type, $attr)=getimagesize($uploadfile);
- $str=”;
- if($w>550){
- $str="width:550px;";
- }
- if($h>550){
- $str.=" height:550px;";
- }
- $str=emptyempty($str)?”:"style=’ ".$str." ‘";
- $f1="<img src=’$uploadfile’ border=0 $str id=’cropbox’ >";
- $f2="<img src=’$uploadfile’ border=0 $str id=’preview’ >";
- echo ‘<script language="javascript">parent.$("#showBig").html("’.$f1.‘");parent.$("#showThumb").html("’.$f2.‘");parent.goss();parent.$("#bigwidth").val("’.$w.‘");parent.$("#bigheight").val("’.$h.‘");parent.$("#bigImage").val("’.$uploadfile.‘");</script>’;
- }else {
- echo "<script>alert(‘文件上传失败!’);</script>";
- }
- }
- ?>
- <div style="margin:0px;font-size:12px;">
- <FORM ACTION="?act=upload" METHOD=POST enctype="multipart/form-data">
- <input type="file" name="file" id="file" />
- <input type="submit" name="button" id="button" value="提交" />
- <input name="upload" type="hidden" id="upload" value="upload" /><input type="hidden" name="MAX_FILE_SIZE" value="3000000" />
- </FORM>
- </div>
- <?php
- exit;
- }
- ?>
- <div id="showBig" style="width:500px;height:500px;border:2px solid #E6E0CE;padding:3px;"></div>
- <iframe style="width:500px;height:60px;padding:0px;" src="?act=upload"></iframe>
- <div id="showThumb" style="width:152px;height:152px;border:1px solid #cccccc;padding:1px; overflow: hidden;"></div>
- <div style="margin-top:20px;">
- <form action="?act=saveThumb" method="post" onsubmit="return checkCoords();">
- <input type="hidden" id="bigImage" name="bigImage" />
- <input type="hidden" id="bigwidth" name="bigwidth" />
- <input type="hidden" id="bigheight" name="bigheight" />
- <input type="hidden" id="x" name="x" />
- <input type="hidden" id="y" name="y" />
- <input type="hidden" id="w" name="w" />
- <input type="hidden" id="h" name="h" />
- <input type="submit" value="保存用户头像" />
- </form>
- </div>
- </body>
- </html>
下载
11月21日刘宁生日快乐
去了萧山,风景不错,就是人烟少了点!