分类目录归档:centos/nginx/apache

通过修改nginx配置,让nginx支持thinkphp等所需的PATH_INFO

第一种,最简单的方法:

加上一句

location ~ \.php {
         fastcgi_pass 127.0.0.1:9000;
         fastcgi_index index.php;
         fastcgi_param SCRIPT_FILENAME /var/www/company$fastcgi_script_name;
         fastcgi_param  PATH_INFO $fastcgi_script_name;
         include /etc/nginx/fastcgi_params;
}

第二种方法:(注意:nginx 0.5 版此方法无效)

location ~ \.php
              {
                   fastcgi_pass 127.0.0.1:9000;
                   fastcgi_index index.php;
                   set $path_info "";
                   set $real_script_name $fastcgi_script_name;
                   if ($fastcgi_script_name ~ "^(.+?\.php)(/.+)$") {
                        set $real_script_name $1;
                        set $path_info $2;
                   }
                   fastcgi_param SCRIPT_FILENAME /var/html/$real_script_name;
                   fastcgi_param SCRIPT_NAME $real_script_name;
                   fastcgi_param PATH_INFO $path_info;

                   include /etc/nginx/fastcgi_params;
              }

ubuntu8.10快速架设nginx2.6+php5.2.6+mysql5.0 [修改1]

nginx的高效率是出了名了,最近想用它把服务器上的apache换掉,所以先在本地机上做了下测试。

下面为记录下的步骤!

第一步,安装mysql
sudo apt-get install mysql-server

第二步,安装php-cgi及所需gd库等
sudo apt-get install php5-cli php5-cgi php5-mysql php5-gd php5-mcrypt

第三步,安装nginx
sudo apt-get install nginx

第四步,从lighttpd中取得spawn-fcgi

apt-get install lighttpd

cp /usr/bin/spawn-fcgi ./
apt-get remove lighttpd

cp spawn-fcgi /usr/bin/

sudo vi /usr/bin/php-fastcgi

    #!/bin/sh
    /usr/bin/spawn-fcgi -a 127.0.0.1 -p 9000 -C 10 -u www-data -g www-data -f /u    sr/bin/php-cgi
    #注意 -C 10 表示开启10个php-cgi进程!

sudo chmod 755 /usr/bin/php-fastcg

sudo vi /etc/init.d/init-fastcgi

C++代码
  1. #!/bin/bash   
  2.   
  3. PHP_SCRIPT=/usr/bin/php-fastcgi   
  4.   
  5. RETVAL=0   
  6.   
  7. case "$1" in   
  8.   
  9.     start)   
  10.   
  11.       $PHP_SCRIPT   
  12.   
  13.       RETVAL=$?   
  14.   
  15.   ;;   
  16.   
  17.     stop)   
  18.   
  19.       killall -9 php5-cgi   
  20.   
  21.       RETVAL=$?   
  22.   
  23.   ;;   
  24.   
  25.     restart)   
  26.   
  27.       killall -9 php5-cgi
  28.   
  29.       $PHP_SCRIPT   
  30.   
  31.       RETVAL=$?   
  32.   
  33.   ;;   
  34.   
  35.     *)   
  36.   
  37.       echo "Usage: php-fastcgi {start|stop|restart}"  
  38.   
  39.       exit 1   
  40.   
  41.   ;;   
  42.   
  43. esac   
  44.   
  45. exit $RETVAL   
  46.   
  47.   

chmod 755 /etc/init.d/php-fastcgi

开启spawn-fcgi
/etc/init.d/php-fastcgi start

写入开机启动!
update-rc.d php-fastcgi defaults

查看php-cgi进程
ps ax | grep php5-cgi

第五步,配置nginx
sudo vi /etc/nginx/sites-enabled/default

server {
    listen   80;
    server_name  localhost;

    access_log  /var/log/nginx/localhost.access.log;

    location / {
        root   /home/xzy/www;
        index  index.html index.htm index.php;
    }

    location /doc {
        root   /usr/share;
        autoindex on;
        allow 127.0.0.1;
        deny all;
    }

    location /images {
        root   /usr/share;
        autoindex on;
    }

    #error_page  404  /404.html;

    # redirect server error pages to the static page /50x.html
    #
    error_page   500 502 503 504  /50x.html;
    location = /50x.html {
        root   /var/www/nginx-default;
    }

    # proxy the PHP scripts to Apache listening on 127.0.0.1:80
    #
    #location ~ \.php$ {
        #proxy_pass   http://127.0.0.1;
    #}

    # pass the PHP scripts to FastCGI server listening on 127.0.0.1:9000

    #去除php支持的注释!
    location ~ \.php$ {
        fastcgi_pass   127.0.0.1:9000;
        fastcgi_index  index.php;
        #为防止php.ini里的cgi.fix_pathinfo 不为1的话,就直接修下php脚本运行的路径!
        fastcgi_param SCRIPT_FILENAME /home/xzy/www$fastcgi_script_name;

        include /etc/nginx/fastcgi_params;        
    }

    # deny access to .htaccess files, if Apache’s document root
    # concurs with nginx’s one
    #开启支持.htaccess
    location ~ /\.ht {
        deny  all;
    }
     #博客的图片较多,更改较少,将它们在浏览器本地缓存15天,可以提高下次打开我博客的页面加载速度。
    location ~ .*\.(gif|jpg|jpeg|png|bmp|swf)$
    {
        expires 15d;
    }
}

sudo gedit /etc/nginx/fastcgi_params

最后一行注释掉

#fastcgi_param  REDIRECT_STATUS    200;

重启nginx   sudo /etc/init.d/nginx restart 看是否运行正常,正常的话,环境就算搭配成功了!
在/home/xzy/www上新建一个a.php测试下phpinfo是否正常!
vi /home/xzy/www/a.php
<?php phpinfo();?>

最后优化下nginx
vi /etc/nginx/nginx.conf

user www-data;
#修改nginx的进程数,每个进程占内存10~15m 按服务器配置和应用需求来设
worker_processes  1;

error_log  /var/log/nginx/error.log;
pid        /var/run/nginx.pid;

events {
    worker_connections  1024;
}

http {
    include       /etc/nginx/mime.types;
    default_type  application/octet-stream;

    access_log    /var/log/nginx/access.log;

    sendfile        on;
    #tcp_nopush     on;

    #keepalive_timeout  0;
    keepalive_timeout  65;
    tcp_nodelay        on;
    gzip  on;

    #开启并设置gzip配置   对网页文件、CSS、JS、XML等启动gzip压缩,减少数据传输量,提高访问速度
    gzip on;
    gzip_min_length  1k;
    gzip_buffers     4 16k;
    gzip_http_version 1.0;
    gzip_comp_level 2;
    gzip_types       text/plain application/x-javascript text/css application/xml;
    gzip_vary on;

    include /etc/nginx/conf.d/*.conf;
    include /etc/nginx/sites-enabled/*;

}

小内存机器ubuntu下安装Nginx+php+Mysql+phpmyadmin

1,安装nginx,执行以下命令,很快完成,不过目前apg-get方式安装默认是0.5.33的版本

sudo apt-get install nginx

配置文件默认安装位置:

  [quote]conf: /etc/nginx/nginx.conf
  bin:/usr/sbin/nginx
  vhost: /etc/nginx/sites-enable/default
  cgi-params: /etc/nginx/fastcgi-params[/quote]

  建一个虚拟Server

  server {
  listen 80;
  server_name www.23day.com;
  access_log /var/log/nginx/home.ucenter.access.log;

  location / {
  root /var/www/23day.com;
  index index.php;

  location ~ \.php$ {
  fastcgi_pass 127.0.0.1:9000;
  fastcgi_index index.php;
  fastcgi_param SCRIPT_FILENAME /var/www/23day.com$fastcgi_script_name;
  include /etc/nginx/fastcgi_params;
  }
  }

2,安装php-cgi模块

执行sudo apt-get install php5-cgi

配置文件默认安装位置:

  php-cgi: /usr/bin/php-cgi
  php5-cgi: /usr/bin/php5-cgi
  cgi config: /usr/bin/cgi/php.ini [/quote]

修改php.ini文件的cgi.fix_pathinfo数据为1,默认为0 cgi.fix_pathinfo=1; 这样php-cgi方能正常使用SCRIPT_FILENAME这个变量.

  3,安装spawn-fcgi spawn-fcgi是lighttpd的一个用来控制php-cgi的工具.

如果系统没有安装GCC编译环境,刚需要在安装lighttpd之前要安装build-essential工具包,执行以下命令

  sudo apt-get install build-essential
  wget http://www.lighttpd.net/download/lighttpd-1.4.19.tar.gz
  tar -xvf lighttpd-1.4.19.tar.gz
  cd lighttpd-1.4.19/
  sudo apt-get install libpcre3-dev
  ./configure –without-zlib –without-bzip2
  make
  sudo cp src/spawn-fcgi /usr/local/bin/spawn-fcgi

这样cgi控制器就安装完成.

  4.启动测试系统.启动fast_cgi:

  spawn-fcgi -a 127.0.0.1 -p 9000 -C 5 -u www-data -g www-data -f /usr/bin/php-cgi

  注意:ip,端口与nginx服务器中的cgi-pass要对应. -C表示打开几个cgi进程

  启动nginx

  sudo /etc/init.d/nginx start

  好了,如果没有出错信息,则说明配置成功了,现在写个phpinfo测试下吧!

  最后,附上我的/etc/nginx/sites-enable/default的配置文件,此配置文件启用了rewrite功能

  server {
  listen 80;
  server_name localhost;

  access_log /var/log/nginx/localhost.access.log;

  location / {
  root /var/www/nginx-default;
  index index.php;

  if (-f $request_filename/index.html){
  rewrite (.*) $1/index.html break;
  }
  if (-f $request_filename/index.php){
  rewrite (.*) $1/index.php;
  }
  if (!-f $request_filename){
  rewrite (.*) /index.php;
  }

  }

  #error_page 404 /404.html;

  # redirect server error pages to the static page /50x.html
  #
  error_page 500 502 503 504 /50x.html;
  location = /50x.html {
  root /var/www/nginx-default;
  }

  # proxy the PHP scripts to Apache listening on 127.0.0.1:80
  #
  #location ~ \.php$ {
  #proxy_pass http://127.0.0.1;
  #}

  # pass the PHP scripts to FastCGI server listening on 127.0.0.1:9000
  #
  location ~ \.php$ {
  fastcgi_pass 127.0.0.1:9000;
  fastcgi_index index.php;
  fastcgi_param SCRIPT_FILENAME /var/www/nginx-default$fastcgi_script_name;
  include /etc/nginx/fastcgi_params;
  }

  # deny access to .htaccess files, if Apache’s document root
  # concurs with nginx’s one
  #
  #location ~ /\.ht {
  #deny all;
  #}
  }

  # another virtual host using mix of IP-, name-, and port-based configuration
  #
  #server {
  #listen 8000;
  #listen somename:8080;
  #server_name somename alias another.alias;

  #location / {
  #root html;
  #index index.html index.htm;
  #}
  #}

  # HTTPS server
  #
  #server {
  #listen 443;
  #server_name localhost;

  #ssl on;
  #ssl_certificate cert.pem;
  #ssl_certificate_key cert.key;

  #ssl_session_timeout 5m;

  #ssl_protocols SSLv2 SSLv3 TLSv1;
  #ssl_ciphers ALL:!ADH:!EXPORT56:RC4+RSA:+HIGH:+MEDIUM:+LOW:+SSLv2:+EXP;
  #ssl_prefer_server_ciphers on;

  #location / {
  #root html;
  #index index.html index.htm;
  #}
  #}


nginx.conf优化

 user  www www;

#Nginx每个进程耗费10M~12M内存,这里只开启一个Nginx进程,节省内存。
worker_processes 1;

error_log  /data1/logs/nginx_error.log  crit;

pid        /usr/local/webserver/nginx/nginx.pid;

#Specifies the value for maximum file descriptors that can be opened by this process.
worker_rlimit_nofile 51200;

events
{
use epoll;
worker_connections 51200;
}

http
{
include       mime.types;
default_type  application/octet-stream;

#charset  gb2312;
   
server_names_hash_bucket_size 128;
client_header_buffer_size 32k;
large_client_header_buffers 4 32k;
   
sendfile on;
tcp_nopush     on;

keepalive_timeout 60;

tcp_nodelay on;

fastcgi_connect_timeout 300;
fastcgi_send_timeout 300;
fastcgi_read_timeout 300;
fastcgi_buffer_size 64k;
fastcgi_buffers 4 64k;
fastcgi_busy_buffers_size 128k;
fastcgi_temp_file_write_size 128k;

#对网页文件、CSS、JS、XML等启动gzip压缩,减少数据传输量,提高访问速度。
gzip on;
gzip_min_length  1k;
gzip_buffers     4 16k;
gzip_http_version 1.0;
gzip_comp_level 2;
gzip_types       text/plain application/x-javascript text/css application/xml;
gzip_vary on;

#limit_zone  crawler  $binary_remote_addr  10m;

server
{
  listen       80;
  server_name  blog.s135.com www.s135.com s135.com *.s135.com;
  index index.html index.htm index.php;
  root  /data0/htdocs/blog;

  #limit_conn   crawler  20;    

  #针对Bo-Blog系统的Rewrite静态化
  rewrite ^/post/([0-9]+).htm$ /read.php?$1 last;
  rewrite ^/post/([0-9]+)_([0-9]+).htm$ /read.php?$1&page=$2 last;
  rewrite ^/post/([0-9]+)_([0-9]+)_([0-9]+).htm$ /read.php?$1&page=$2&part=$3 last;
  rewrite ^/index_([0-9]+)_([0-9]+).htm$ /index.php?mode=$1&page=$2 last;
  rewrite ^/star_([0-9]+)_([0-9]+).htm$ /star.php?mode=$1&page=$2 last;
  rewrite ^/category_([0-9]+).htm$ /index.php?go=category_$1 last;
  rewrite ^/category_([0-9]+)_([0-9]+)_([0-9]+).htm$ /index.php?go=category_$1&mode=$2&page=$3 last;
  rewrite ^/archive_([0-9]+)_([0-9]+).htm$ /index.php?go=archive&cm=$1&cy=$2 last;
  rewrite ^/archive_([0-9]+)_([0-9]+)_([0-9]+)_([0-9]+).htm$ /index.php?go=archive&cm=$1&cy=$2&mode=$3&page=$4 last;
  rewrite ^/showday_([0-9]+)_([0-9]+)_([0-9]+).htm$ /index.php?go=showday_$1-$2-$3 last;
  rewrite ^/showday_([0-9]+)_([0-9]+)_([0-9]+)_([0-9]+)_([0-9]+).htm$ /index.php?go=showday_$1-$2-$3&mode=$4&page=$5 last;

  location ~ .*\.(php|php5)?$
  {
    #将Nginx与FastCGI的通信方式由TCP改为Unix Socket。TCP在高并发访问下比Unix Socket稳定,但Unix Socket速度要比TCP快。
    fastcgi_pass  unix:/tmp/php-cgi.sock;
    #fastcgi_pass  127.0.0.1:9000;

    fastcgi_index index.php;
    include fcgi.conf;
  }

  location ~ /read.php
  {
    #将Nginx与FastCGI的通信方式由TCP改为Unix Socket。TCP在高并发访问下比Unix Socket稳定,但Unix Socket速度要比TCP快。
    fastcgi_pass  unix:/tmp/php-cgi.sock;
    #fastcgi_pass  127.0.0.1:9000;

    fastcgi_index index.php;
    include fcgi.conf;
  }
 
  #博客的图片较多,更改较少,将它们在浏览器本地缓存15天,可以提高下次打开我博客的页面加载速度。
  location ~ .*\.(gif|jpg|jpeg|png|bmp|swf)$
  {
    expires      15d;
  }

  #博客会加载很多JavaScript、CSS,将它们在浏览器本地缓存1天,访问者在看完一篇文章或一页后,再看另一篇文件或另一页的内容,无需从服务器再次下载相同的JavaScript、CSS,提高了页面显示速度。
  location ~ .*\.(js|css)?$
  {
    expires      1d;
  }  

  log_format  access  ‘$remote_addr – $remote_user [$time_local] "$request" ‘
            ‘$status $body_bytes_sent "$http_referer" ‘
            ‘"$http_user_agent" $http_x_forwarded_for’;
  access_log  /data1/logs/access.log  access;
  }
}


PHP 5.2.6(FastCGI)的配置优化

[eaccelerator]
zend_extension="/usr/local/webserver/php/lib/php/extensions/no-debug-non-zts-20060613/eaccelerator.so"
eaccelerator.shm_size="1"
eaccelerator.cache_dir="/usr/local/webserver/eaccelerator_cache"
eaccelerator.enable="1"
eaccelerator.optimizer="1"
eaccelerator.check_mtime="1"
eaccelerator.debug="0"
eaccelerator.filter=""
eaccelerator.shm_max="0"
eaccelerator.shm_ttl="3600"
eaccelerator.shm_prune_period="3600"

eaccelerator.shm_only="0"
eaccelerator.compress="1"
eaccelerator.compress_level="9"
eaccelerator.keys = "disk_only"
eaccelerator.sessions = "disk_only"
eaccelerator.content = "disk_only"
 

vi中最最常用的一些命令

命令全部在命令模式下输入 (就是记得输命令时按下ESC键)

保存文件     :w    (注意,前面有:)

强制保存文件 :w!

退出文件但不保存    :q

强制奶出文件但不保存 :q!

保存并退出   :wq  (同理,如果是强制的话,加!)

==================================

在光标所在行插入新行    o      (注意,不是零,是字母o)

在光标前面插入字符     i

在光标后面输入字符      a

删除一行     dd

删除光标所在的字符    x

转到具体的一行    10gg  或是 :10    (10为行号)

转个首行     gg

转个尾行      shift+g

清空全部内容   :%d

清空光标所在行及下面全部行的内容   dG   (注意大小写)

撤销上一步操作     u

重做上一步操作     ctrl+r

搜索查找字符       ?str    或   /str     (str表示要查找的字符)

===========================================

这些是最基本的了,还有像替换之类的比较复杂的就找找vi的全部命令看看

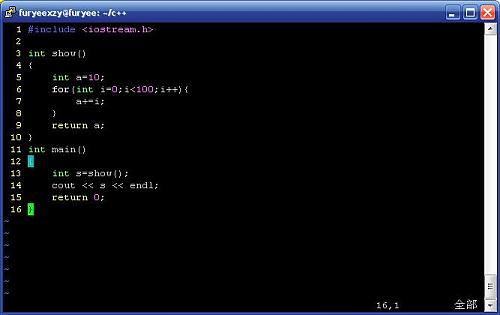
Ubuntu vim 高亮

1、安装vim

       sudo apt-get install vim-full
2、配置文件的位置
在目录 /etc/vim 下面,有个名为vimrc的文件,这是系统中公共的vim配置文件,对所有用户都有效。
       3、设置语法高亮显示
1) 打开vimrc,添加以下语句来使得语法高亮显示:
syntax on
2) 如果此时语法还是没有高亮显示,那么在/etc目录下的profile文件中添加以下语句:
export TERM=xterm-color
      
       4、设置Windows风格的C/C++自动缩进(添加以下set语句到vimrc中)
              1设置(软)制表符宽度为4
                            set tabstop=4
                            set softtabstop=4
              2设置缩进的空格数为4
                          set shiftwidth=4
              3设置自动缩进即每行的缩进值与上一行相等;使用 noautoindent 取消设置:
set autoindent
              4设置使用 C/C++ 语言的自动缩进方式:
                          set cindent
              5)设置C/C++语言的具体缩进方式
                            set cinoptions={0,1s,t0,n-2,p2s,(03s,=.5s,>1s,=1s,:1s
              6)如果想在左侧显示文本的行号,可以用以下语句:
                          set nu
              7)最后,如果没有下列语句,就加上吧:
if &term=="xterm"
set t_Co=8
             set t_Sb=^[[4%dm
set t_Sf=^[[3%dm
endif

一下由网友kongove提供:

colorscheme elflord
"colorscheme darkblue
"colorscheme evening
"colorscheme murphy
"colorscheme torte
"colorscheme desert
这些事提供的一些配色方案,自选一种就很漂亮了~


22.jpg

Ubuntu 单网卡架设VPN并NAT共享上网办法

服务器使用shorewall作为防火墙,实际上shorewall只是作为iptables的一个配置程序而已,实际上防火墙还是iptables;
首先是建立VPN,使用软件包PPTPD,这样做的好处是方便认证,也支持windows,安全性不如openvpn,但是简单实用;


服务器环境:
OS:ubuntu server 8.04.1
firewall: shorewall
IP:192.168.2.100
安装:

sudo apt-get install pptpd

修改配置文件:/etc/pptpd.conf

修改localip  remoteip

localip 192.168.250.1
remoteip 192.168.250.234-238,192.168.250.245

这里随便找了个IP段localip相当于拨号后的服务器地址,可以写成本机IP,或者和remoteip的IP段相同的一个IP地址

remoteip是客户机分配的IP段,这里分配了12个IP地址,也就只允许12个机器同时通过VPN连接,再增加就不能分配到IP地址了

修改配置文件:/etc/ppp/chap-secrets

这个文件里面设置登陆用的账号密码等信息

设置格式是:

# client        server  secret                  IP addresses

abc       *            123456

第一个是用户名  然后是服务器地址   然后是登陆所用的密码  最后是为客户拨号后分配的IP地址,不指定的话就是系统自动分配

以上过程之后,咱的PPTPD就配置好了哈

由于服务器采用了shorewall防火墙,需要开放端口1723,47和gre协议

编辑/etc/shorewall/rules

增加:

ACCEPT          net             $FW             gre
ACCEPT          net             $FW             tcp     1723
ACCEPT          net             $FW             tcp     47

然后重启下shorewall:

sudo shorewall restart

开始测试在windows上VPN拨号吧

windows下VPN连接建立方法就不多说了哈

OK,测试VPN可以拨通了,但是还不能通过服务器的网络连接互联网,可能你会发现,除了访问服务器,其他你什么都干不了

下面来做NAT,不过这个地方我也没做得很好,还有点缺陷,希望以后能解决这个问题

拨通VPN后,在服务器上使用ifconfig可以看到多了一个PPP*的网络连接,例如我这里是ppp0

做NAT我也使用shorewall来做

修改/etc/shorewall/interface

增加:

ppp0   ipv4

修改/etc/shorewall/zones

增加:

ppp    ppp0

修改/etc/shorewall/masq

增加:

eth0                    ppp0

OK,然后重启shorewall

sudo shorewall restart

NAT配置好了

这里要注意的是ppp0一定要存在,否则shorewall要报错,这个就是shorewall不足的地方了,不够灵活。

如果你不用shorewall 防火墙,直接使用iptables指令进行dnat操作,就不会因为没有ppp0连接而报错了。

关注了几天国外的vps,今天出手了,先买一个月试用

配置有点低,但对于只是学习或是小流量网站放放还是不错的,
硬盘:1G (做个系统加php环境就用旧了350m)
内存:384 M (max从面板上看的,min就不清楚了,面板上没标)
IP数:1
流量:75G/月
节点:524288  (文件和文件夹的总个数,装完全部的系统环境才用20000多)
备份:2  (可以在线做二次备份)


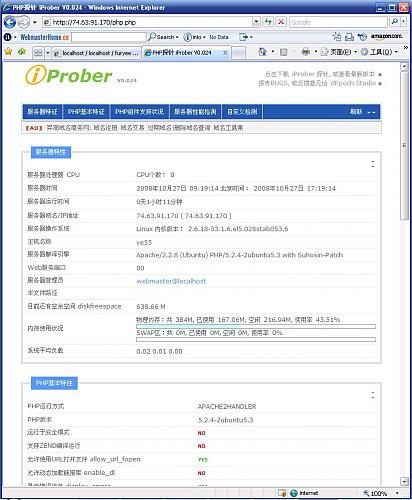
IP地址:74.63.91.170

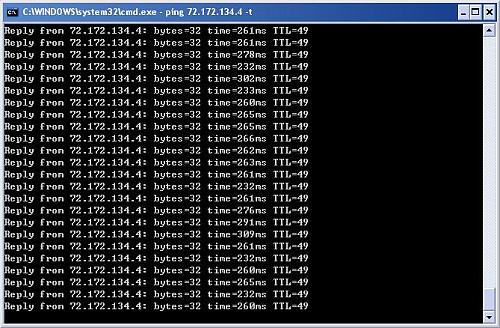
国内ping vps的速度平均在230ms左右(ping了一个下午) 对于国外服务器来说速度还是不错的!

关键是价格非常便宜  $3.5/mo (也就二十多块钱一个月,这个价格是国内是想都不用想的!)

以后有需要的话还可以非常方便的进行方案升级!

给大家贴个地址:http://www.vpsrepublic.com (就三个方案 $3.5/mo  $5.5/mo  $9.5/mo 都挺便宜)

都是美元购买,记得要有一张国际信用卡才能支付。。

还有swvps的$9.9/mo方案,10G硬盘 2个IP地址 250G流量 400-600M的内存 这个买一年的话是$99.9 价格还行 速度据说在国外的vps中是数一数二的 ping 的值基本在200ms左右
http://www.swvps.com/linux-vps.html


可选装的系统有:

centos-5-i386-afull (304.28MB) 
centos-5-i386-cpanel (2665.59MB)
centos-5-i386-hostinabox571 (2279.81MB)
cern-4-x86_64-minimal (135.65MB)
debian-4.0-i386-minimal (134.91MB)
fedora-9-i386-default (427.88MB) 
fedora-core-5-i386-afull (319.8MB) 
fedora-core-6-i686-default (415.64MB) 
 fedora-core-7-ut (445.63MB)
gentoo-20060317-i686-stage3 (317.3MB) 
gentoo-openvz-i686-2008.08.26 (384.61MB) 
opensuse-10-i386-default (282.33MB) 
ubuntu-6.06-i386-minimal (155.74MB) 
ubuntu-8.04-i386-minimal (121.18MB) 

可选系统比较多,非常适合新手拿来练习用,弄坏了。直接Rebuild一下,相当于重装系统了!只要花几秒钟就好了,但数据得备份好

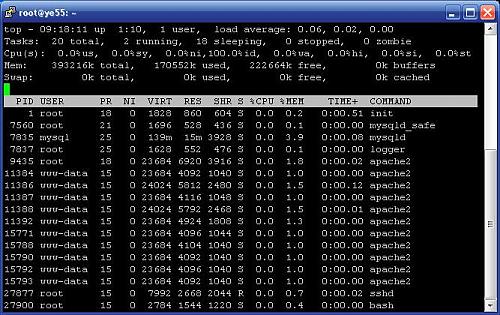
我用了centos debian ubuntu 最后学是选了ubuntu 8.04版,ubuntu用得比较熟,其实centos也是不错的选择只是安装后占用的硬盘比较大,所以就不选了,用ubuntu安装php apache mysql等软件,最后占用硬盘容量才360m 内存占用160m!

下面发几张截图:


tt1.jpgtt2.jpgtt3.jpgtt4.jpgtt5.jpg

国内和国外DNS服务器地址 全国各地电信DNS服务器地址

2008-07-21 15:18
国内和国外DNS服务器地址 全国各地电信DNS服务器地址
北京:
202.96.199.133  
202.96.0.133
202.106.0.20
202.106.148.1
202.97.16.195
202.138.96.2

上海:
202.96.199.132
202.96.199.133
202.96.209.5
202.96.209.133

天津:
202.99.96.68
10.10.64.68
广东:
202.96.128.143
202.96.128.68
202.96.128.110
深圳:
202.96.134.133
202.96.154.8
202.96.154.15
黑龙江:
202.97.229.133
202.97.224.68
219.150.32.132
河南:
202.102.227.68
202.102.245.12
202.102.224.68
广西:
202.96.128.68
202.103.224.68
202.103.225.68
福建:
202.101.98.54
202.101.98.55
厦门:
202.101.103.55
202.101.103.54
湖南:
202.103.0.68
202.103.96.68
202.103.96.112
江苏:
202.102.15.162
202.102.29.3
202.102.13.141
202.102.24.35
陕西:
202.100.13.11
202.100.4.16
西安:
202.100.4.15
202.100.0.68
湖北:
202.103.0.68
202.103.0.117
202.103.24.68
山东:
202.102.154.3
202.102.152.3
202.102.128.68
202.102.134.68
浙江:
202.96.102.3
202.96.96.68
202.96.104.18
辽宁:
202.98.0.68
202.96.75.68
202.96.75.64
202.96.69.38
202.96.86.18
202.96.86.24
安徽:
202.102.192.68
202.102.199.68
10.89.64.5
重庆:
61.128.128.68
10.150.0.1
河北:
202.99.160.68
10.17.128.90
保定:
202.99.160.68
202.99.166.4
吉林:
202.98.5.68
202.98.14.18
202.98.14.19
江西:
202.101.224.68
10.117.32.40
202.109.129.2
202.101.240.36
山西:
202.99.192.68
202.99.198.6
新疆:
61.128.97.74
61.128.97.73
贵州:
202.98.192.68
10.157.2.15
云南:
202.98.96.68
202.98.160.68
四川:
202.98.96.68
61.139.2.69
重庆:
61.128.128.68
61.128.192.4
成都:
202.98.96.68
202.98.96.69
内蒙古:
202.99.224.68
10.29.0.2
青海:
202.100.128.68
10.184.0.1
海南:
202.100.192.68
202.100.199.8
宁夏:
202.100.0.68
202.100.96.68
甘肃:
202.100.72.13
10.179.64.1
香港:
205.252.144.228
208.151.69.65
202.181.202.140
202.181.224.2  
台湾:
168.95.192.1
168.95.1.1
澳门:
202.175.3.8
202.175.3.3

各大网站DNS列表

天府热线DNS:61.139.2.69

长春163  :202.98.0.68
       202.98.3.68

263在线  :211.100.2.130
       211.100.1.10

中国万网  :210.79.232.248
  DNS  :210.192.103.50   (dns1.hichina.com)
  DNS  :202.106.169.100  (dns2.hichina.com)

新网    :211.99.199.194
      :211.99.199.195

263IDC   :211.100.2.130  (NS.263IDC.COM)
      :211.100.1.10   (NSB.263IDC.COM)

教育网内的DNS服务器
202.114.64.2武大DNS1 (一区)
202.114.96.1 武大DNS2 (二区)
202.114.96.2 武大DNS3 (二区)
202.114.112.13 武大DNS4 (三区)
202.114.0.242 server20.hust.edu.cn 华工DNS
202.112.0.35 dns.hust.edu.cn 华工DNS2
202.112.20.131 dns.whnet.edu.cn 华中地区网络中心DNS
166.111.8.28 dns-a.tsinghua.edu.cn清华DNS1
166.111.8.29 dns-b.tsinghua.edu.cn清华DNS2
166.111.8.30 dns.tsinghua.edu.cn 清华DNS
166.111.168.12清华DNS
202.117.0.20 dec3000.xjtu.edu.cn 西交DNS1
202.117.0.21 ns2.xjtu.edu.cn 西交DNS2
202.112.26.34上交
202.112.112.100 人大
162.105.129.27北大
202.203.128.33 cernet云南中心主dns
202.203.128.34
202.115.64.33 and 202.115.64.34 西南交大
202.201.48.1 and 202.201.48.2 nwnu
210.33.116.112 浙江电大
202.116.160.33 华南农业
202.114.240.6 wust
202.194.48.130 ytnc
202.112.0.33 and 202.112.0.34 cernet 华北网

全球路由DNS服务器
全球只有13台路由DNS服务器(Route Server),在13台路由服务器中,名字分别为“A”至“M”,其中10台设置在美国,另外各有一台设置于英国、瑞典和日本。下表是这些机器的管理单位、设置地点及最新的IP地址。http://koogou.net其中,IP地址等参考了“named.root”文件:
名称  管理单位及设置地点    IP地址
A INTERNIC.NET(美国,弗吉尼亚州) 198.41.0.4
B 美国信息科学研究所(美国,加利弗尼亚州) 128.9.0.107
C PSINet公司(美国,弗吉尼亚州) 192.33.4.12
D 马里兰大学(美国马里兰州) 128.8.10.90
E 美国航空航天管理局[NASA](美国加利弗尼亚州) 192.203.230.10
F 因特网软件联盟(美国加利弗尼亚州) 192.5.5.241
G 美国国防部网络信息中心(美国弗吉尼亚州) 192.112.36.4
H 美国陆军研究所(美国马里兰州) 128.63.2.53
I Autonomica公司(瑞典,斯德哥尔摩) 192.36.148.17
J VeriSign公司(美国,弗吉尼亚州) 192.58.128.30
K RIPE NCC(英国,伦敦) 193.0.14.129
L IANA (美国,弗吉尼亚州) 198.32.64.12

国外DNS服务器地址

新西兰
202.27.184.3

美国
165.87.13.129
165.87.201.244
205.171.3.65
205.171.2.65
198.41.0.4
198.41.0.4
198.32.64.12
192.33.4.12
192.203.230.10
192.5.5.241
192.112.36.4
192.36.148.17
192.58.128.30
192.9.9.3
193.0.14.129
128.9.0.107
128.8.10.90
66.33.206.206.
208.96.10.221
66.33.216.216
208.67.222.222
208.67.220.220
205.171.3.65
205.171.2.65
165.87.13.129
165.87.201.244

加拿大
209.166.160.36
209.166.160.132

泰国
202.44.8.34
202.44.8.2

印度
202.138.103.100
202.138.96.2

英国
193.0.14.129

日本
202.12.27.33
202.216.228.18

韩国
164.124.101.31
203.248.240.31
168.126.63.60
168.126.63.61

新西兰
202.27.184.3

加拿大
209.166.160.36

泰国
209.166.160.132
202.44.8.34
202.44.8.2

ubuntu快速架设subverstion服务器

1、安装

$ sudo apt-get install subversion

2、创建 SVN 仓库

$ sudo mkdir /home/svn

$ cd /home/svn

$ sudo mkdir myproject

$ sudo svnadmin create /home/svn/myproject

$ sudo chmod 777 * -R

3、配置svnserve.conf

去掉下面的注释

[general]

anon-access = read (none,禁止匿名读取)
       auth-access = write

password-db = passwd

去掉passwd中的两行注释

注意:anon,auth,password前面不能有空格

[users]
      #harry = harryssecret
      #sally = sallyssecre
      username=password

5、起动服务

svnserve -d –foreground -r /home/svn

6、访问url

svn://127.0.0.1/myproject

7、重启subverstion

ps aux (查看所有进程)

       kill xxxx (进程为svnserve 的pid)